Introducción
En este desmontaje te enseñaremos como desmontar tu PlayStation 2 de Sony.
Qué necesitas
Resumen del Video
-
-
Aquí podemos observar la consola totalmente montada.
-
Los puertos USB.
-
Los puertos firewire S400.
-
La unidad óptica.
-
El botón de reset o reinicio.
-
El botón para abrir la tapa.
-
-
-
En este caso en la parte trasera tenemos un adaptador ethernet que al mismo tiempo es la bahía para el disco duro. Además también podemos observar el ventilador para la refrigeración de nuestra PlayStation 2.
-
El botón de la alimentación.
-
El conector para la alimentación.
-
La salida AV (audio y video).
-
La salida digital óptica.
-
-
-
Comencemos con el desmontaje. Para empezar utilizaremos un destornillador plano para quitar el adaptador de ethernet.
-
Quita estos dos tornillos.
-
Y quítala simplemente tirando.
I have the ethernet adaptor with mine but no hard drive, how do you get the hard drive to work in it?
Cita de Chris Green:
I have the ethernet adaptor with mine but no hard drive, how do you get the hard drive to work in it?
it is a mod. you can look it up
-
-
-
Esta es la bahía de expansión donde el va colocado el disco duro.
I got my ps2 from flea market and it didn't have a lid to cover up the expansion bay is that ok to leave it like that
-
-
-
¡Sorpresa! Debajo de las patas de goma se esconden tornillos.
-
Tendremos que quitar los 8 tornillos.
-
¡Vamos, manos a la obra!
Hello, nice review! Can you help me out with a question i have? I have this PS2 Fat, i miss those big long screws that hold the outside shell, i need to buy them (if i can) so i can only find long screws from the PS3 4000, does those screws fit into PS2 Fat aswell? Do you know?thanks!
-
-
-
-
Quita estos dos tornillos para desconectar las ranuras de los mandos.
I've tried cleaning my memory slot ports. They look fine. I'm wondering if I just have crap luck and got 2 bad cards or do I need to replace the part.
My controller ports work fine though. Same cable I'd imagine
-
-
-
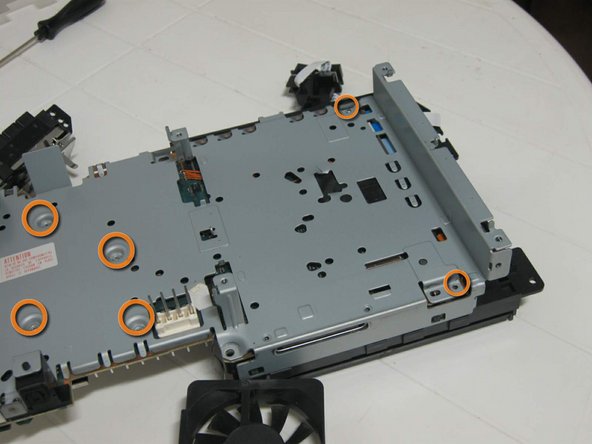
En este paso quitaremos los tornillos de la refrigeración y del botón principal de alimentación.
After reassembly, I have a fifth screw identical to the ones shown in Step 11 and Step 12 left over, any idea where it goes?
When you remove the power/ac plug there is a spot for the screw underneath.
-
-
-
Ahora quitaremos la rejilla de la bahía de expansión.
I just broke the fan pins because you have to push the connector to the side and then up. There are 2 hooks that hold the connector in place.
-
-
-
Quita el plástico de protección térmica de la carcasa.
-
Quita los tornillos pequeños utilizando un destornillador Phillips pequeño.
-
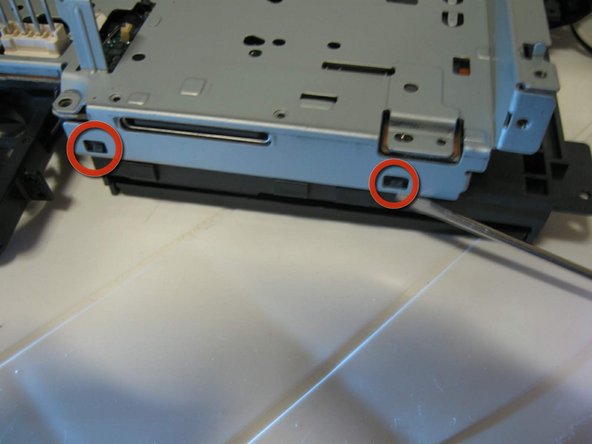
Y quita la carcasa metálica del lector de DVD, como se indica, utilizando un destornillador plano pequeño.
-
-
-
Bien, ahora intentaremos quitar el cable del ventilador que no pudimos quitar anteriormente.
-
El conector está hecho para desconectarlo, pero está viejo y parece que se han convertido en uno solo y he roto la soldadura.
-
Encontraré una forma de arreglarlo, ¡siempre lo hago! =)
How did you fix same happened to me
-
-
-
Este es el final del desmontaje.
-
Desde la parte superior izquierda: Adaptador de ethernet, disco duro, rejilla de ventilación, protección inferior metálica, placa de los puertos de los mandos, plancha plástica para aislar la placa de alimentación, protector metálico superior, lector de DVD, tapa de la bahía de expansión, placa base y estructura plástica del botones reset/eject.
You probably shouldn’t put electronics on cloth, but I guess its about 9 years too late for that.
-


Un agradecimiento especial a estos traductores:
70%

¡ MemoryOverflow nos está ayudando a reparar el mundo! ¿Quieres contribuir?
Empezar a traducir ›
12 comentarios
reverse procedures..step by step..
Yep in reverse, take your time or you'll be like me breaking things and having to rig it haha. Put the shielding back together, drive, power board, the other shield for hard drive. Everything, plug all connections. Even power-reset buttons. Then put it on the bottom casing, connect controller ports and close it up with top casing.
If a cable is ripped or broken, unfortunately there is no way to fix it. You will have to replace the cable.
I put a lot of layers of tape on mine, the last owner of my system was very naughty and disassembled the system when it was still under warranty, so the cable was brokem
John Doe -
do you have the list of screws required for this? i am missing a few trying to locate the size specs
Hi, I have a problem with a hardly used PS2. When I turn it on it only displays some coloured squares. I don’t know if the video chip has gone. Do you have any ideas??
i'd need to see it to tell you whats wrong. what do you mean by coloured squares??
Camdyn -
So I’m curious does all PS2s take thermal paste? Bcuz I noticed the cpu/gpu chip looked like it had some on it b4!
And I was going to get inside as I need to change the coin battery but I'm not going to bother it's ridiculous just to get to it
This helped me teardown an old PS2 I just bought a few days ago.
With your help, I was able to give it a thorough clean inside and out and swap the BIOS battery. It looks and works almost like brand new now.
Thank you so much Pollux! 🙂❤️