Saltar al contenido principal

Qué necesitas

Este desmontaje no es una guía de reparación. Para reparar tu Nokia N900, utiliza nuestros manuales de servicio .

  1. Nokia N900 Teardown, Nokia N900 Teardown: paso 1, imagen 1 de 1
    • Set the phone face down so the back of the phone is facing up.

  2. Nokia N900 Teardown: paso 2, imagen 1 de 1
    • Find the slit on the side of the phone and use your fingers to gently pry off the back cover.

  3. Nokia N900 Teardown: paso 3, imagen 1 de 1
    • Carefully remove the rectangular-shaped battery from the center of the phone.

  4. Nokia N900 Teardown: paso 4, imagen 1 de 1
    • Remove the six screws from the top and bottom of the back of the phone.

  5. Nokia N900 Teardown: paso 5, imagen 1 de 2 Nokia N900 Teardown: paso 5, imagen 2 de 2
    • Gently pull the phone screen away from the base of the phone.

    • You should have two pieces: the phone screen and the base of the phone.

  6. Nokia N900 Teardown: paso 6, imagen 1 de 2 Nokia N900 Teardown: paso 6, imagen 2 de 2
    • Carefully remove the keyboard mat from the base of the phone.

  7. Nokia N900 Teardown: paso 7, imagen 1 de 3 Nokia N900 Teardown: paso 7, imagen 2 de 3 Nokia N900 Teardown: paso 7, imagen 3 de 3
    • Slide the blue iFixit Opening Tool under the green motherboard and the base. Gently separate the green motherboard from the base of the phone.

  8. Nokia N900 Teardown: paso 8, imagen 1 de 2 Nokia N900 Teardown: paso 8, imagen 2 de 2
    • Flip the base of the phone over and remove all six screws from the top and bottom of the phone.

  9. Nokia N900 Teardown: paso 9, imagen 1 de 1
    • Pull the screen and the base apart so that there's two separate pieces.

  10. Nokia N900 Teardown: paso 10, imagen 1 de 2 Nokia N900 Teardown: paso 10, imagen 2 de 2
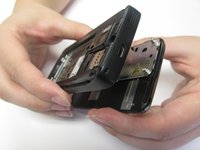
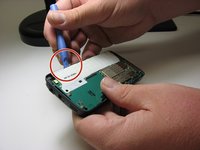
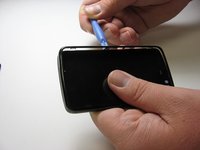
    • Use the blue iFixit Opening Tool to carefully pry off the outer rim of the phone screen.

    • To avoid breakage, pry each side of the screen off individually. This will help loosen the parts and ease the disassembly process.

  11. Nokia N900 Teardown: paso 11, imagen 1 de 1
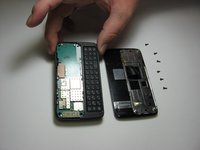
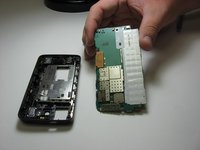
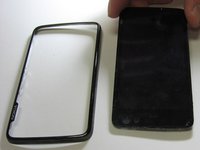
    • Once the screen is separated from the outer rim, remove the screen cover.

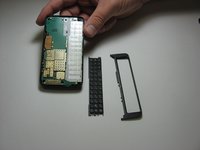
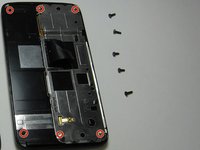
    • This is the final step. You should have three pieces of the disassembled screen: the outer rim, the screen, and screen cover.

    • Congrats, you've successfully completed a Nokia N900 teardown!

Juan Haro

Miembro Desde 03/13/14

284 Reputación

2 Guías creadas

Equipo

Un comentario

Looks like the LCD flex cable ripped off on this teardown, ouch!

Leonard Putra - Contestar

Agregar Comentario

Ver Estadísticas:

Ultimas 24 horas: 0

Ultimos 7 días: 5

Ultimos 30 días: 26

Todo El Tiempo: 5,820