Introducción
Tenemos en nuestras manos la nueva Nintendo DSi.
Qué necesitas
-
-
¡Ya está aquí! ¡Ya está aquí! ¡Whoopee!
-
Contenido de la caja:
-
Nintendo DSi
-
Manual de uso
-
Guía rápida de inicio
-
Adaptador de corriente alterna
-
Un Stylus extra
-
Una invitación del Mario's hat para unirse al Club Nintendo.
-
-
-
Una comparación lado a lado de la Nintendo DS Lite (izquierda) y la Nintendo DSi (derecha).
-
El DSi tiene una nueva piel: un color negro mate (casi gris oscuro) que se siente mucho más áspero que el DS Lite. La rugosidad permite un mejor agarre del sistema, así como una mejor resistencia al rayado.
-
El DSi es 3 mm más delgado que el DS Lite, mientras que su largo y ancho aumentan en 4 mm y 1 mm, respectivamente.
-
El DSi viene con paneles LCD de 3.25 ", un total de 0.25" más grande que los paneles de 3 "del modelo anterior.
-
-
-
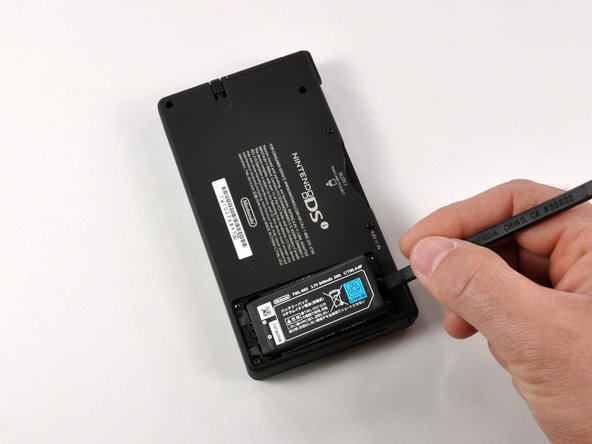
Hay un total de siete tornillos que mantienen unida la carcasa inferior de la DSi:
-
Tres son inmediatamente visibles sin quitar ningún tapón o tapa.
-
Se deben quitar dos tapones cerca de la parte superior de la unidad para dejar al descubierto dos tornillos.
-
La extracción del compartimento de la batería revela dos tornillos adicionales que deben quitarse.
-
-
-
-
Una comparación entre lo viejo y lo nuevo. Existen claras diferencias entre DS Lite (izquierda) y DSi (derecha).
-
El DSi usa una batería recargable más pequeña de 840 mAh (derecha) en comparación con los 1000 mAh del DS Lite (izquierda). La diferencia de tamaño es proporcional a la diferencia de capacidad. La Nintendo DS original se envió con una batería de 850 mAh.
-
-
Este paso está sin traducir. Ayuda a traducirlo
-
Four black plastic covers need to be removed to reveal the Phillips screws underneath.
-
Removing the four Phillips screws allows access to the top display.
-
-
Este paso está sin traducir. Ayuda a traducirlo
-
The upper half with outer case removed.
-
The antenna board for Wireless LAN is mounted in the upper right corner of the chasis.
-
The ribbon cables for the top display and cameras are coiled and routed through the hinge between case halves. We'll go ahead and add that to the list of parts we want to watch a robot assemble.
-
The thin orange wire seen in the second photo is for the microphone. Little DJs everywhere will drool over a new feature allowing users to distort the pitch and speed of music during playback.
-
-
Este paso está sin traducir. Ayuda a traducirlo
-
The DSi has two VGA CMOS digital cameras (0.3 megapixels); one on the internal hinge pointed towards the user and the other in the outer shell.
-
-
Este paso está sin traducir. Ayuda a traducirlo
-
Eight Phillips screws secure the battery compartment and the stylus tray/SD/SDHC expansion slot to the case.
-
The DSi has an integrated SD/SDHC expansion slot. You can now use a normal SD card for the playback of AAC audio files and external storage of pictures or downloaded software. Can anyone say homebrew apps?
-
-
Este paso está sin traducir. Ayuda a traducirlo
-
The logic board in its full glory.
-
Chips of interest, left to right:
-
Samsung 1st generation MoviNAND KMAPF0000M: 256 MB NAND Flash and MMC controller. The integrated MMC controller allows the CPU to offload the complex work of directly talking to the flash memory.
-
82DBS08164D-70L: Fujitsu Ltd 128-bit FCRAM (fast-cycle RAM) chip.
-
Nintendo's custom ARM CPU. Our CPU was manufactured in September of 2008.
-
-
Este paso está sin traducir. Ayuda a traducirlo
-
Nintendo DSi... REST IN PIECES!
-
Chips of interest:
-
Samsung 1st generation MoviNAND KMAPF0000M: 256 MB NAND Flash and MMC controller. The integrated MMC controller allows the CPU to offload the complex work of directly talking to the flash memory.
-
82DBS08164D-70L: Fujitsu Ltd 128-bit FCRAM (fast-cycle RAM) chip.
-
Nintendo's custom ARM CPU. Our CPU was manufactured in September of 2008.
-


Un agradecimiento especial a estos traductores:
68%


Estos traductores nos están ayudando a reparar el mundo! ¿Quieres contribuir?
Empezar a traducir ›

10 comentarios
This is Nintendo DSi Teardown
Wow I never would have guessed that
I would like to contribute to iFixit by doing a 3DS XL Teardown. (2012), but i do not have the console.
You should be careful when removing the L button assembly and moving a case. There’s a small square pocket in the case which houses a small square nut which is where the top screw from the battery lid fastens to. The black piece that keeps the L shoulder button assembly in place also holds this nut. Once you remove it, the nut is free to come out and can be easily lost.