Introducción
Lo mejor de lo mejor de esta temporada de Android ha llegado — es la sensacional fableta de Google, Nexus 6P. Por primera vez en la historia, este dispositivo viene a nosotros a través del fabricante Huawei—y ya que nunca hemos tenido una oferta de Huawei en nuestra mesa de desmontaje, estamos entusiasmados por empezar. ¿Podrá el Nexus 6P estar en la cima de la escala de reparabilidad o nos decepcionará? Veamos.
Hay más desmontajes —síguenos en Facebook, Instagram, y Twitter para todas las travesuras de desmontajes.
Qué necesitas
Resumen del Video
-
-
Ahora que ya hemos desenvuelto el primer acto, es hora del evento principal. Esto es lo que Google dice sobre su más reciente Android:
-
Procesador de 64 bits con 8 núcleos Qualcomm Snapdragon 810 v2.1, 2.0 GHz con Adreno 430 GPU
-
Cámara trasera de 12.3 MP/4K con autofoco asistido por láser y estabilización de imagen electrónica, cámara frontal de 8 MP
-
Pantalla AMOLED 5.7” WQHD 2560 × 1440 (518 ppi)
-
3 GB LPDDR4 RAM con 32 GB, 64 GB, o 128 GB de almacenamiento interno
-
Puerto USB tipo C
-
Lectura de huella digital Nexus Imprint y Núcleo Sensor Android
-
Android 6.0 Marshmallow
-
-
-
Es la primera vez que un dispositivo de Nexus presenta un chasis de aluminio anodizado de grado aeronáutico totalmente de metal.
-
Estamos bastante seguros que el 6P no está diseñado para funcionar como una rampa para tu Tech Deck.
-
La meseta de cámara elevada es aparentemente la estrategia de Huawei para estrujar una cámara de 4K en el teléfono nuevo. O, como nosotros, podrían estar obsesionados con mesetas.
-
Mirándolo más de cerca, podemos ver que las lentes de vidrio cubren las pendientes en una suave curva en cada extremo.¡Qué elegante!
-
-
-
Comparado con su mellizo, el Nexus 5X (arriba), el 6P brilla a través de su pantalla Wide Quad HD AMOLED.
-
Solo para divertirnos, comparamos el 6P con tu viejo Nexux 6. Con su casi idéntica presencia, puedes conseguir un triple bono si puedes decir cuál es cuál.
-
No sabemos que pasa si conectas dos 6Ps que están a 50% de batería. Asumimos que ambos se cargarán a 100%. Carga perpetua, problema resuelto.
Why stop there? Come up with a USB-C splitter cable, connect the two 6Ps, and then you have perpetual power that's actually useful!
if only it were that simple. When I was a kid I had this idea that you could run a generator that's solar powered, have a lightbulb that puts out enough power to run the solar panel AND the generator... and run other items of said generator.
this was of course before I understood the nature of electricity and effectiveness and lost power etc etc.
Can someone identify the chips belonging to the Android Sensor Hub? On the 5X ist was a pressure sensor, geomagnetic sensor, a combined gyro/accelerometer and an STM32.
I have no idea why they label the chips the way they do. If a sensor is called 'BMP280', why not label it with that? Why do they use some random other letters and numbers?
Anyway, would be cool if someone could help! Thanks!
/edit: found the same STM32F411CE as on the 5X. Top right from the processor.
Pressure sensor is on the top right of the PCB, but no idea which model. Has a different number on it that the one on the 5X.
Did you figure out what specs the acceleramotor/gyroscope have in the Nexus 6p?
Shouldn't the Avago 77814-1 in step 15 be listed as a Skyworks SKY77814-11? The Skyworks logo is clearly visible on the chip.
Yes. Thanks for the correction! It reads correctly now.
The metal part on the mainboard beside the CPU and Flash chip seems to be the SIM card bay. Looks like it can hold 2 SIM cards!?
There was another [leaked?] video of an earlier prototype advertising this capability. Please try this iFixit?
That definitely is the SIM reader on the motherboard, and it does look wide enough for two SIMS! However, the SIM tray in our device only has a single slot. Perhaps different carriers or markets will see the 6P able to support multiple SIMs, but not ours.
-
-
-
Como el Nexux 6, no hay tornillos visibles en la cubierta trasera. A diferencia del Nexus 6, este es un dispositivo unibody, así que no habrá ninguna útil cubierta trasera removible.
-
La caja lisa del 6P solo puede romperse por este pequeño y sospechoso panel plástico en la parte inferior. Utilicemos un iOpener caliente y veamos lo que hay dentro.
-
Con suficiente calor, el panel se puede levantar y desprender, exponiendo cuatro tornillos.
Don't forget to remove the SIM card tray, like I did!
Almost broke my screen trying to pull it apart with the tray in.
-
-
-
No fue muy difícil llegar a los tornillos debajo de la cubierta de plástico, pero hay también tornillos debajo de la cubierta de la cámara también...
-
El panel en cuestión está hecho de vidrio muy frágil ensamblado a la perfección. Remover esto no será para nada divertido.
-
Luego de bastantes minutos desalentadores, podemos utilizar el iSclack y sacar el teléfono de su caja posterior.
One supposes that if it's that easy to break the glass camera cover, replacement camera covers will become available.
My camera glass cover cracked after a literal 6" drop. Yikes. I hope replacements are available.
Are those additional sensors to the right of the lazer auto focus? If so, what happens when these are covered by a case?
Don't forget to seal properly the camera glass, because mine got dust in about 2 month. Now I need to clean the camera sensor from dust. Seems like doable, but I need to open this %#*@ thing again and crack the metalic camera case open, don't loose camera balls that should be inside, don't scratch the sensor while cleaning it and assemble it all in revese again.
I was using a heat gun on the glass, it did not take much heat to warm it up. Don't put too much heat or you will start to melt the plastic LED cover for flash. I recommend using a sharp hobby knife (i.e. The X-Acto) to fit into the same side in the picture here. Hope this helps anyone.
-
-
-
Con las primeras aventuras de adhesivo ya atrás, el 6P ha finalmente salido de su caparazón.
-
A diferencia de otros teléfonos que hemos visto recientemente, no hay un ensamblaje de pantalla discreto o una cubierta trasera que se remueve fácilmente aquí. En vez, las partes internas de 6P salen de la caja trasera como un ensamblaje de tamaño mega, dejando solo la antena NFC atrás.
-
Si lo miramos de forma positiva, parece que el cable de interconexión de la placa hija es todo lo que se interpone entre nosotros y la batería!
Can you please let me know how long this battery can last if I use Nexus stock charger?
Huawei support team said they don't have any service to replace battery after warranty? :(
-
-
-
-
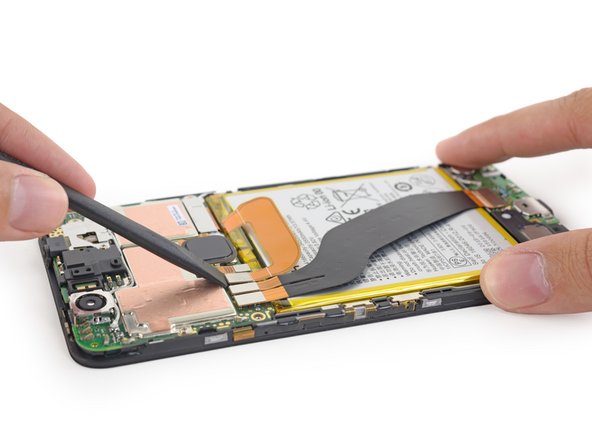
La batería es un monstruo— y está fieramente pegada. Pero al menos no tuvimos que excavar mucho para llegar ahí.
-
La policelda de litio de súper tamaño de 3.82 V, 13.18 Wh tiene una capacidad de 3450 mAh.
Careful! There is a ribbon cable right under the battery (it the screen cable), don't pry on the cable or get under it.
I second Ian’s caution. I barely nicked the little rounded tab near the bottom of the cable and it rendered the touchscreen worthless. Had to buy a new (used) one.
Class listen to Ian. I shredded the ribbon cable under the battery while prying out the battery. Yuck.
Same as Mike, just tore mine in half using a credit card behind the battery. Why the !&&* do they use such large amounts of tape!!! now i have to buy a new phone, as the ribbon is attached to the screen perminently! Not bothering with this phone anymore. 16 months of great, the 1 month of crap battery life. Not worth the shoddy assembly to be honest.
Why isn’t the ribbon cable mentioned in this step in the removal? Tearing it is (obviously) easy trying to fight adhesive and it results in your repair jumping up 160$ in price. Next thing you know you’re 200 bucks into a phone that isn’t known for its longevity to begin with…
I tore the ribbon with an iFixIt plastic card after failing to see the mentions in the comments (which aren’t visible by default). Rest in peace Nexus 6p
-
-
-
Luego, arrancamos una de las placas hija más pequeñas que hayamos visto. Es solo un poco más pequeña que una simple placa USB-C.
-
El lado frontal de la placa hija presenta un hardware de control y contactos de resorte para la antena LTE...
-
Y en la parte trasera, espiamos uno de los tres micrófonos a prueba de ruidos del 6P y un par de contactos más, para el motor vibrador y el altavoz.
Does anyone know which part contains a noise cancelling microphone? My 6p is out of warranty and has the muffled microphone issue. Wondering if replacing the daughterboard / speakerbox would make any difference, or if the culprit microphone is located on the motherboard itself.
Did you ever replace the Daughterboard in order to fix that microphone issue?
-
-
-
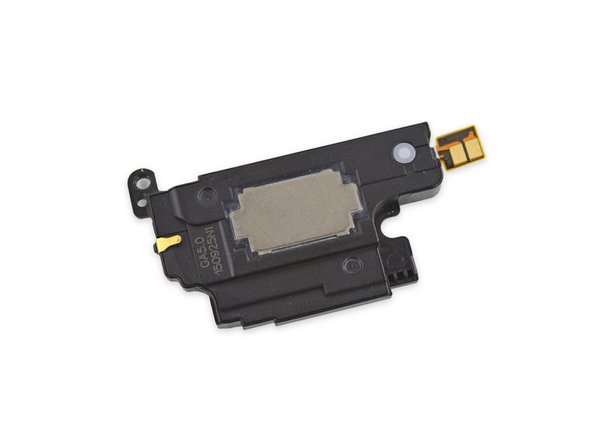
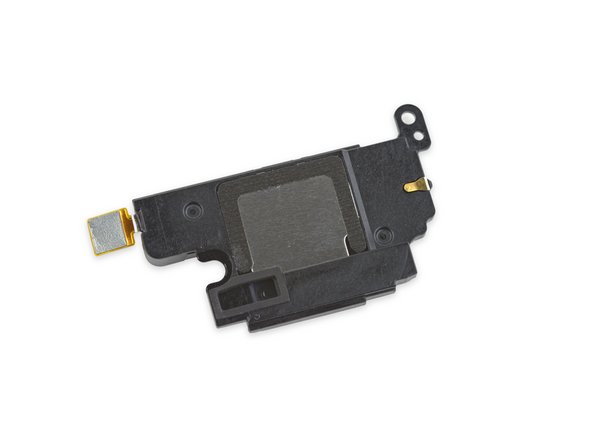
Continuamos nuestra investigación a lo largo de la parte inferior del teléfono y nos encontramos con lo que parece ser una caja de altavoz.
-
Sospechamos que el motivo de Google para incluir estos altavoces frontales es bastante simple: las personas prefieren altavoces que estén frente a ellas.
-
Por supuesto esto no dice nada de cómo en realidad suena. Tendremos que esperar hasta que volvamos a arma nuestro 6P para poder escucharlo.
-
-
-
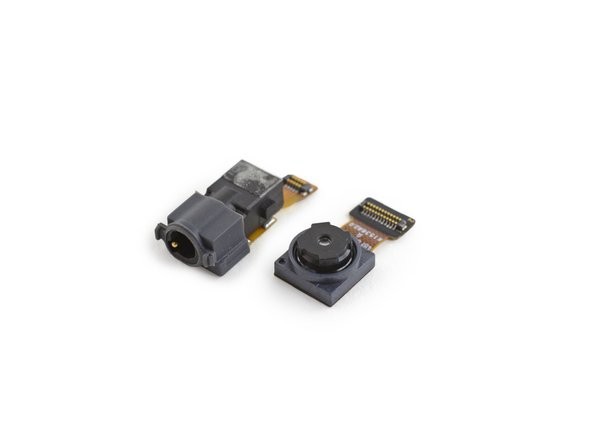
Lo próximo en salir en la toma de auricular, la que encontramos enmarcada en una pequeña manga de goma. Hmmm.
-
Mientras hemos estado observando atentamente si hay señales de impermeabilización, esta manga pequeña sola no indica si Google estará preparándose para las mareas altas.
-
Seguimos adelante y sacamos la cámara frontal (selfie). Está cámara de 8 MP, ƒ/2.4 es 3 MP más que su contraparte en el 5X, pero todavía mantiene el mismo tamaño de píxel de 1.4 micrón.
-
Sacamos algunas fotos de nuestros amigos periféricos recién descubiertos y nos dirigimos al núcleo.
-
-
-
La mayoría de los periféricos están fuera del camino, permitiéndonos enfocarnos en la placa madre—libre de pegamento y rematada con una pasta pegajosa de pasta térmica, justo como nos gusta.
-
Bien, esto es raro. Si bien la cámara frontal no dio mucha peleas, parece que la cámara está soldada en su lugar.
-
-
-
.... ¡o no!
-
Si bien tienes que remover la placa madre para acceder a la cámara principal, resulta ser que la solo el soporte de la cámara está soldado a la placa. La cámara en si se desconecta y remueve fácilmente.
-
-
-
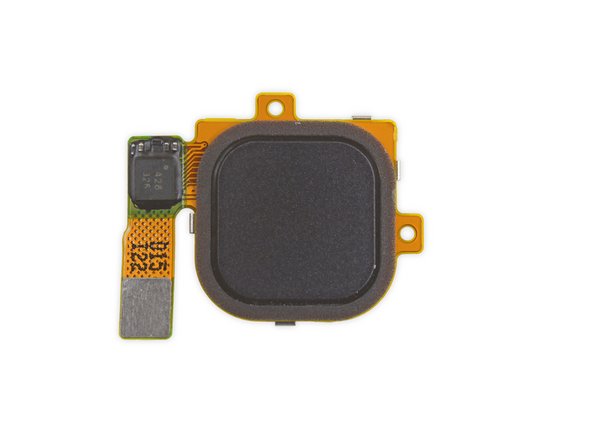
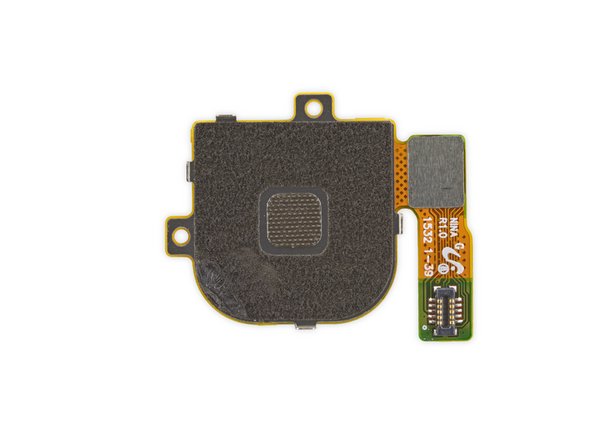
Con el spudger listo, dirigimos nuestra atención al sensor cuadrado Nexus Imprint.
-
Resulta ser que esta versión del sensor Imprint es bastante diferente a la que encontramos en el 5X. El perfil circular en este lector de huella digital es únicamente debido al orificio redondo en la caja trasera del 6P.
who manufactures the Nexus Imprint sensor? I have read that Fingerprint Card does, as well as one of the new nexus sensors (5x/6p) is the same as the OnePlus Two sensor. Any info on this would be appreciated. Thank you.
-
-
-
¡Olemos chips! Con la placa madre libre y el escudo EMI retirado, es hora de mirar a los chips:
-
Micron MT53B384M64D4NK-062 3 GB LPDDR4 RAM, encima de Qualcomm Snapdragon 810 v2.1, 2.0 GHz, de 8 núcleos y 64-bit CPU
-
Samsung KLMBG4GEND-B031 32 GB eMMC 5.0 NAND Flash
-
CI de Administración de potencia Qualcomm PMI8994 (como en muchos teléfonos inteligentes Android 2015 incluso el Nexus 5X)
-
CI de Carga Rápida Qualcomm SMB1351 (posiblemente una iteración de SMB1358como en el Nexus 5X)
-
CI de Rastreo de la Envolvente Qualcomm QFE1100
-
ST Microelectronics STM32F411CE 32-bit 100 MHz ARM Cortex-M4 RISC microcontrolador
-
Amplificador de Audio Maxim Integrated MAX98925
Same thing happened in Step 15 with the amplifier, but they corrected it. I verified that the Skyworks logo is on the ACPM-7251 as well. Hopefully, this will get fixed soon, just as the other one was.
It's been removed altogether. I guess that's one way to fix it. lol
jon -
On this step, on the left upper corner, it's like there are 2 SIMs slots, or a SIM slot + SD card slot. Are both connected ? If so, why the SIM tray is only for 1 SIM card ?
-
-
-
La parte trasera de la placa madre está lleno de aun más hardware de control:
-
Broadcom BCM43585G WiFi 802.11ac Client
-
CI Administración de Potencia Qualcomm PM8994 (como en el Nexus 5X y HTC One M9)
-
Controlador NFC NXP PN548
-
Qualcomm WCD9330 Audio Codec
-
Transceptor RF Qualcomm WTR3925
-
Módulo de Interruptor de Antena RF Microdevices RF1891
-
Módulo de Amplificador de Potencia para LTE Skyworks 77814-11
I have noticed on this teardown as well as your LG 4 you do not identify the IMU. It would be great in the future you start doing this since it will be important to those who are looking for the best mobile VR smartphone.
Thanks
-
-
-
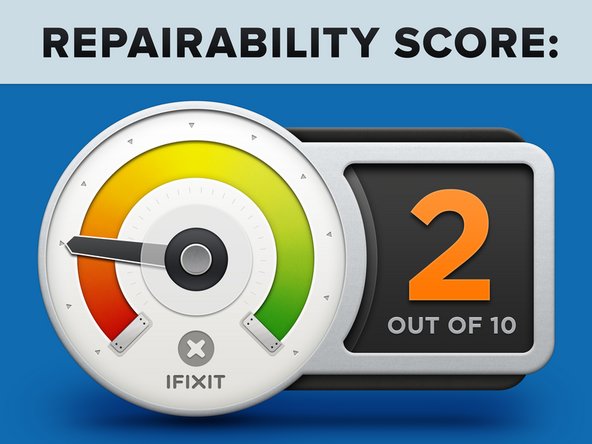
Puntaje de Reparabilidad de Nexus 6P: 2 de 10 (10 es lo más fácil de reparar)
-
La construcción externa sólida mejora la durabilidad.
-
Una vez que el arduo procedimiento de apertura esté completo, la batería es accesible de forma inmediatamente.
-
Es muy difícil — aunque no imposible —abrir el dispositivo sin dañar la cubierta de vidrio de la cámara. Debido al diseño unibody, cada componente es extremadamente difícil de reemplazar.
-
El ensamblaje de la pantalla no puede reemplazarse sin excavar en todo el teléfono. Esto hace que las reparaciones comunes, como una pantalla dañada, sean difíciles de lograr.
-
El adhesivo resistente sujeta los paneles de la cubierta trasera y la batería en su lugar.
-


Un agradecimiento especial a estos traductores:
61%

¡ Mariana Roca nos está ayudando a reparar el mundo! ¿Quieres contribuir?
Empezar a traducir ›

48 comentarios
For step 7, don't know if anyone has noticed the typo... You say the nexus 6p has 700mAh more battery than the iphone 6s... 6s has ~1750mAh and the 6p has 3450 mAh... That's almost double the battery size (1700 mAh difference). Just a stickler for an order of magnitude :D Thanks for the great teardown, sad to see the 6p isn't easily repaired...
We're actually comparing the battery in the Nexus 6P to the battery in the 6s Plus, not the 6s. The 6s Plus has a 2750 mAh battery :)
At least the battery is not "smaller than promised" like iPhone
The battery is Li-Po and not Li-ion tech which is more safer and lasts longer. I'd rather have the iPhone battery still. Lasts just as long in my experience.
Jake -
Li-Po means Li-polymer.Li-Po is included in Li-ion, which means lithium batteries.iPhone's batteries are the same Li-Po batteries,they're just written Li-ion.
Nah, lithium ion is a different ype from lithium ion; even bother googling that?
Just being a stickler but an order of magnitude is a factor of 10
Is there any information regarding the headphone jack audio amplifier chip?
I actually came over to see if I could replace the screen if it broke (My Note 2 needed a repair in just five days of purchasing it). Apparently Google sucks at inheritance of qualities in its nexus devices
Andrew, thanks for setting me straight! I wish I had reread and seen that it was for the 6s plus. I appreciate you taking the time to respond though :)
Slime, you're right, and order of magnitude is 10 times larger... I was at a loss for what to call a difference from 3 digits to 4. Any ideas? I guess I could have said more than double instead...
On removing the camera glass, I found the best place to get a purchase with a razor blade was on the curved portion. And I had to get it HOT. I was using a heat gun (didn't think a table would work with the curved glass) and it didn't come off for me until I had heated several times and got the temperature to the point of being hot enough that you could only touch the glass very quickly (< 1 second). How you could possibly remove that without scuffing the frame at all though is beyond me. The metal frame is incredible sensitive to showing wear from a metal tool.
Also, the bottom plastic one starts bending pretty quickly from the heat. I'd use a slight about of heat but mostly rely on an opening tool to tear the adhesive.
Definitely agree, had to use more heat than I thought I should have used, crank that heat gun up people. I ended up cracking the glass on the back, but of course I started on the opposite side of the camera. Luckily all the cracks are covered by my case.
Tips learned:
Use lots and lots of heat
Work on the camera glass from the side opposite the lenses
You WILL scuff metal opening this thing
What are the sensors that we can see inside the camera hump once that glass came off as some cases actually cover most of this area?
Actually scratch that - now that I look closer at the close up photo I see they are just a couple of holes, one with some foam under it and one looking down on the back of the headphone jack component.
Monty M -
What would it take to put the back and camera glass back on? I dropped mine 12 hrs after getting it and now my volume key is bent so I can only lower the volume.
Anyone knows the logo on the orange part of the fingerprint sensor?
Does anyone know where to find a original nexus 6p back housing, or how mutch does it cost?
Hi every one my name is shabeer i have a issue in my nexus 6p and it has network ic problem can any one let me know the network ic model in nexus 6p it will be a great help thank you.
Can you please confirm , if FM chip is inside the Nexus 6p. If FM chip and receiver is enabled then we all can hear the FM Radio for free and save a lot on the data usage . Thanks
no there is no fm chip in the nexus 6p
Question: so ive apparently suffered from the "jeans too tight bent my volume rocker" problem, and i am in the early learning stages of the repair ability preparation process. I dont mind having to tackle this repair myself (as opposed to RMA'ing the device, as many have done) since I have planned on swapping out the gold housing with a different color since i first purchased the device. Its not because the gold is my LEAST favorite color of the 4-- in fact, its actually the ONLY color option that i don't like. I purchased the gold one because i was able to get a 32 gb version for just over $300 brand new at a crazy random sale/opportunity, and so I knew iFixit wouldn't let me down when it came to showing me how to get that desired colorway while still saving one or two benjamins in the process.
Then, sadly, I hopped on here and learned the bitter truth about the 6p's teardown: it frickin sucks.
so now that story time is over, back to my question: I've decided that since im tearing down anyways, i might as well frankenstein some parts, and so I'm going to either do a White body with black sim card tray, black finger print sensor, power button, volume rocker, etc. I'll probaboly even do the little back bottom battery cover piece in black as well. Theres also a slightly low to to medium chance that I may opt out of the white body and go with the same design, but with a silver housing instead. My question is: ive found every part that i need seperately, but the volume rocker and power button piece seems to only be the ribbon. Does anyone know if the oems selling the housing are including the actual buttons with the main housing, and selling the ribbon seperately? Or do I need to find the black ones to ensure my little colorway variant comes together as i want it to?
Anyone with any advice would be greatly appreciated. p.s. iFixit-- rock on! thank you once again for going where no man has gone (generally, at the time of the original video) and delivering unto us the gift of disassembly.
What is the part number of the Bluetooth Chip here?Manufacturer?
The Broadcom BCM4358 used for Wi-Fi is also capable of Bluetooth, according to the device specs. Click on the link above in the article.
I am trying to find the internal hard drive and attempt to pull my pictures off it. My phone went through the treadmill and wont turn on. Any advice?
You could unsolder the eMMC chips and use a socket reader to pull the data off of them. However, itsecuritything.com stated that google forced full disk encryption out of the box on Nexus 6P. So I'm not sure you can read the data anyway.
Ryan -
Any thoughts where I could find help identifying some of the small electronics on the main board? I lost two small components when swapping out the screen. Now the screen works, but it does not recognize the sim. The two components are circled in red in the lower right corner of this picture.
https://postimg.org/image/b4wqltgox/
It's a long shot, but if I could get replacements maybe I could manage to solder them back on.
Burton, the SMDs you have circled are capacitors. By the size of them they are bypass caps for a DC line. I would try a 1uF cap or 10uF cap and see if that fixes your issue. It's hard to tell from the picture but the size looks like a 0201. You'll have to measure the pad spacing to be sure.
Hope that helps,
Daniel
Thanks for the tutorial, it's very helpful. Can you please tell me how may I change the sim card holder?
Do i have to remove all the electronic stuff off the back including the battery and speaker? why can't i just remove the glass once i remove it all from the frame???
Where is the Bosch BMM150 geomagnetic sensor?
Hi. what about reassembly? Do we need to re-glue the glue we cut?
The glue still sticks fairly well when you just press it together,
What about re-assembly? Do we need to re-glue the fierce glue we cut? Do you have that glue?
Did you ever find an answer to you adhesive question? I too am about to replaces the battery in my 6p, and all the tear-downs I seen just stick the battery, glass lens cover, and plastic bottom piece right back on. Is the adhesive strong enough to reuse?
You don’t need glue - you can just press it back together and it sticks.
I don’t get an LTE or 3G antenna bars any longer after taking it and getting my battery replaced. What part would I need to get replaced and can I order that?
I need to have the part replaced that handles comm. My phone doesn’t have the LTE or 3G cell antenna bars. Bluetooth & WiFi still work though. No cell service at all. New SIM too, just doesn’t work any longer.
There doesn’t seem to be a text guide on here on how to change the battery in the Nexus 6P, so I made a video. It’s at https://www.youtube.com/watch?v=C9K0A79s... - hope it’s useful to somebody! :)
Just a warning about removing the battery. Angle the card toward the battery and away from the body/screen. I didn’t and tore the LCD flexible flat cable that is underneath. Even more unfortunately, it seems to be attached to the LCD and not separately replaceable.
What is the flex connector that's on the display frame? Pictured on Step 16 to the far right. Wide, black with two 45 degree bends?
Hi Javier,
the flex cable you’re talking about is the display flex cable, which runs through a gap in the mid frame right above where the daughter board is placed.
Where is the Android Sensor Hub mentioned in the beginning. I have problems with all the sensors in my 6p and would like to replace this sensor hub if possible.
Does anyone know the chip part number or pinout of the two 4-pin chips on the bottom right of the motherboard as seen in the Step 14 picture? My deduction is that these chips control the power on / off and volume. My issue is that I am repairing the screen and ordered a replacement that includes screen+frame. In that assembly, the orange ribbon cable as seen on the left side of the bottom case view in the Step 16 is not included. So when the phone is all put together, it will not power one as there is nothing to make contact with these chips. The replacement screens do not seem to have this needed piece. I am thinking I can solder some wires to those pins an short them as needed to make the power / volume functions. My goal is to just get the phone powered with the new screen enough to get the data off the phone, so rigging the wires this way may work. I just need to know the pinout on those chips.
Hello geniuses, I will be very grateful if anyone could help me out on this, I have a nexus 6p I am having a unique issue, in which when I am connecting my charger it's showing a charging sign but the charging percentage isn't increasing a bit, I have changed chargers, batteries and even the charging port, but the issue is still there and when I am going on the battery section through settings it's showing "charger connected, can't charge right now".
Please help me out.