Saltar al contenido principal

Qué necesitas

Este desmontaje no es una guía de reparación. Para reparar tu Motorola Moto G 1st Generation, utiliza nuestros manuales de servicio .

  1. Motorola Moto G 1st Generation Teardown, Motorola Moto G 1st Generation Teardown: paso 1, imagen 1 de 3 Motorola Moto G 1st Generation Teardown, Motorola Moto G 1st Generation Teardown: paso 1, imagen 2 de 3 Motorola Moto G 1st Generation Teardown, Motorola Moto G 1st Generation Teardown: paso 1, imagen 3 de 3
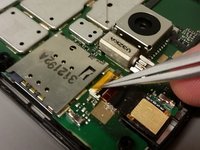
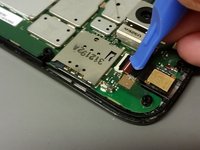
    • After removing the back cover, use a torx T5 to remove all screws at the back

    • Use an opening tool or plastic spuged to remove the outer frame.

  2. Motorola Moto G 1st Generation Teardown: paso 2, imagen 1 de 3 Motorola Moto G 1st Generation Teardown: paso 2, imagen 2 de 3 Motorola Moto G 1st Generation Teardown: paso 2, imagen 3 de 3
    • First we're going to remove the battery

    • Using a plastic spudger, remove the battery connector from its socket.

    • The battery will come off the motherboard when you put a little bit of pressure under it.

    • Don't bend the battery too much

  3. Motorola Moto G 1st Generation Teardown: paso 3, imagen 1 de 1
    • The naked motherboard will reveal 2 connectors (apart from the battery-socket)

    • This is the front-cam

    • This is the digitizer/LCD flex

  4. Motorola Moto G 1st Generation Teardown: paso 4, imagen 1 de 3 Motorola Moto G 1st Generation Teardown: paso 4, imagen 2 de 3 Motorola Moto G 1st Generation Teardown: paso 4, imagen 3 de 3
    • To remove the camera, use a pair of tweezers to remove the tape

    • Next, use a plastic spudger to open up the socket.

    • Pull the camera up (out of the lens-socket) and pull so the flex will come out of it's socket

  5. Motorola Moto G 1st Generation Teardown: paso 5, imagen 1 de 3 Motorola Moto G 1st Generation Teardown: paso 5, imagen 2 de 3 Motorola Moto G 1st Generation Teardown: paso 5, imagen 3 de 3
    • To remove the LCD/Digitizer connection from its socket, remove the blue silicone cover

    • Next, use a plastic spudger to open the socket-lock

    • Carefully remove the flex cable.

    • Although this flex seems to exist in 2 parts, it's actually removable as one. Only the wide flex has to be disconnected.

  6. Motorola Moto G 1st Generation Teardown: paso 6, imagen 1 de 1
    • Now, it's only the motherboard that's left.

    • Use a fine plastic tool to pull the main board out

    • There are no screws at this step

    • Never put too much stress on the motherboard, find other places to put pressure if it doesn't cooperate immediately

  7. Motorola Moto G 1st Generation Teardown: paso 7, imagen 1 de 1
    • All done

    • The earpiece remains in the screen assembly. Take care when removing it from the screen. Push gently on it from the screen-side to lift it out.

Maxim

Miembro Desde 04/30/14

2,297 Reputación

3 Guías creadas

Equipo

iFixers Belgium Miembro de iFixers Belgium

Business

1 Miembro

5 Guías creadas

22 comentarios

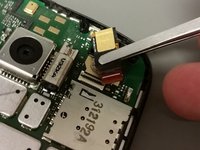
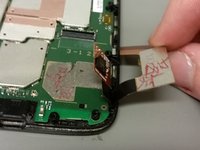
The procedure is very simple, but i realise that take off all the screws is a little bit difficult. As well, remove the motherboard that is attached to the plate behind the screen.

Allan Alcantara - Contestar

Question. How difficult is it to replace the glass?

Abigail McElroy - Contestar

I'm just about to have a go at it now!

I'll let you know

Dan Cameron -

Just replaced the broken screen on my XT1039. Be aware XT1032,XT1033, XT1039 - the screen components are all the same. I bought the screen/frame/digitizer as one unit for the XT1032. It was relatively straight-forward with a bit of care and attention in certain areas. After you've taken the 14 screws out the rest of the phone is basically glued together with sticky-strips. I followed the advice on a You-tube video and used a hair dryer to heat up the ribbon cables and to loosen the earpiece. Phone now fully functional - hooray! Thanks to all on this forum!

camiano - Contestar

Can we further dismantle individual elements on motehrboard? Like I want to replace the memory.

simplyviral - Contestar

Agregar Comentario

Ver Estadísticas:

Ultimas 24 horas: 0

Ultimos 7 días: 4

Ultimos 30 días: 26

Todo El Tiempo: 88,699