Introducción
La tecnología de realidad mixta de The Magic Leap One ha sido un castillo en el aire durante tanto tiempo que casi no podemos creer que lo tengamos en nuestra mesa de desmontaje. Basándonos en la cantidad de dinero recaudado para este proyecto, esperamos que esté alimentado por polvos mágicos, pero solo un desmontaje lo dirá.
¿Quieres ver más secretos de hardware? Entonces conéctate con nosotros en Facebook, Instagram, o Twitter para noticias de última hora.
Qué necesitas
Resumen del Video
-
-
Hay mucho que desentrañar aquí. Comencemos con algunas especificaciones ... err, especificaciones:
-
Nvidia Tegra X2 (Parker) SoC con dos núcleos Denver 2.0 de 64 bits y cuatro núcleos ARM Cortex A57 de 64 bits
-
GPU integrada basada en Pascal con 256 núcleos CUDA
-
8 GB RAM
-
128 GB de almacenamiento a bordo
-
Bluetooth 4.2, Wi-Fi 802.11ac / b / g / n, USB-C, conector para auriculares de 3.5 mm...
-
-
-
Después de las afirmaciones de Magic Leap sobre la experiencia sobrenatural de los auriculares, tuvimos que intentarlo nosotros mismos.
-
Gracias a nuestra confiable cámara de infrarrojos, podemos ver un proyector infrarrojo estroboscópico para detectar la profundidad justo por encima del puente nasal, similar en principio a lo que encontramos en el iPhone X, y antes, el Kinect.
-
Si observas detenidamente, también puedes detectar cuatro LED IR adicionales en cada lente, que "invisiblemente" iluminan sus globos oculares para el seguimiento. (Vamos a desenterrar los rastreadores en breve.)
-
-
-
La creación de contenido comienza en el Lightpack. Proporciona energía y maneja el procesamiento, el envío de datos de imagen y sonido a los auriculares.
-
Mientras tanto, los auriculares Lightwear rastrean la posición y orientación del controlador, y mapean sus alrededores para ayudar a insertar los elementos virtuales.
-
La forma en que se generan esos elementos virtuales es otra lata de gusanos.
-
-
-
La "realidad mixta" es dura. Una cosa es aumentar lo que se ve en una pantalla (como un teléfono inteligente o una pantalla VR con una alimentación de las cámaras exteriores).
-
Es mucho más difícil aumentar la realidad real, sin filtrar, directamente en tu ojo. Para lograr esta ilusión, el Magic Leap One utiliza un par de piezas de tecnología:
-
Pantalla de guía de ondas: esencialmente una pantalla transparente que se ilumina de forma invisible desde el lateral. La guía de ondas (lo que Magic Leap llama un "chip fotónico de campo de luz") guía la luz, en este caso, una imagen, a través de una delgada capa de vidrio, la amplía y la coloca en su ojo.
-
Focos de enfoque:en una pantalla de RV, todo está enfocado todo el tiempo. La realidad es diferente: algunas cosas se ven nítidas, mientras que otras pueden verse borrosas, según dónde se enfoque el ojo.Magic Leap imita el efecto al apilar múltiples guías de onda para crear planos de enfoque, cortando la imagen en áreas nítidas y borrosas.
-
-
-
¡Vamos al tesoro óptico en esta cosa! Una prueba rápida descarta las lentes polarizadas: tendremos que profundizar más para hacer descubrimientos.
-
El interior de las lentes es sorprendentemente feo, con LED IR prominentes, un área de "pantalla" visiblemente estriada de la guía de ondas y alguna aplicación de pegamento impar.
-
La guía de onda consta de seis capas laminadas no muy bonitas, cada una con un pequeño espacio de aire.
-
Los bordes parecen pintados a mano en negro, lo que minimiza los reflejos internos y las interferencias.
I would more tend to think that the waveguides are optically bonded and there are no air gaps. Usually optical bonding minimizes partial reflections at interfaces in order to increase overall contrast. But the waveguides must also rely on total internal reflection. That sounds like conflicting goals.
I was surprised by this as well, but I think if it were bonded all the way across with OCA you wouldn’t be able to see the obvious glue layers around the edges.
The waveguides work by total internal reflection (TIR) cause by the index of refraction mismatch between glass and air. If the layers of glass were bonded together with no gap (or other indexed mismatched material in between) then the light would exit the waveguide to the next layer an you don’t have a waveguide/TIR.
-
-
-
Dentro de la diadema, observamos una etiqueta láser de Clase 1. Puede parecer una cosa aterradora para encontrar en sus gafas, pero es seguro para todas las condiciones de uso normales y probablemente no sea más peligroso que un reproductor de CD.
-
Girando los tornillos Torx estándar y retirando el panel, aparece el primero de los dos altavoces, cableados a través de contactos de resorte, y protegidos por empaques codificados por color.
-
También se esconden debajo de esos paneles: los dos extremos superiores del único cable incorporado del dispositivo, y algunos de los bits magnéticos que ayudan a ajustar el ajuste.
-
Pero, ¿qué es esa extraña caja negra que sobresale del lado derecho de la diadema?
-
-
-
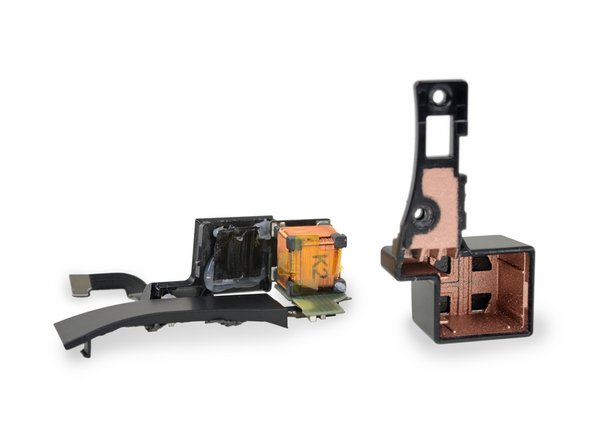
Survey dice: una bobina de sensor magnéticode seis grados de libertad para rastrear la posición del controlador.
-
Al abrir el controlador, encontramos la mitad del rastreador (mucho más grande) y una batería de 8.4 Wh para arrancar.
-
El blindaje de cobre rociado en las carcasas de la bobina probablemente protege de la interferencia de RF, mientras deja pasar el campo magnético.
-
La interferencia podría explicar la ubicación impar del rastreador, y esto puede ser una solución temporal. Es tecnología "vieja", y probablemente será peor para el uso zurdo.
The LED light ring is just for aesthetics, animations etc.
How do we know it’s AC or DC type magnetic tracking from this tear-down image?
28.5 kHz to 42.2 kHz https://www.tomshardware.com/news/magic-...
Source for the cube antennas https://neosid.de/en/news/3d-cube-antenn...
@tom0m Thanks for sharing! Cool find. Added a link in the teardown.
-
-
-
Después de desmontar la diadema y la placa frontal interior, tenemos una mejor vista de los emisores de infrarrojos de seguimiento ocular. Notamos que todos están cableados en serie, en lugar de ser controlados individualmente.
-
Y, finalmente, a nuestro alcance, el corazón del Salto Mágico: la óptica y los ensamblajes de pantallas.
-
Vamos hasta aquí, así que ponte la correa.
Could you please disassemble the strap as well? We haven`t seen a mechanism like this in any HMD yet. Packed in a small space, supposed to last years with enough force to keep it on various head sizes. I really want to know what kind of spring they used for this.
@tancho I only got a glimpse of it when we had it apart, but it looked like a single constant-force spring packed into the center plastic segment at the back.
-
-
-
-
Levantando una de las matrices de sensores externos, encontramos debajo: el sistema óptico para inyectar imágenes en las guías de onda.
-
Cada punto vive a una profundidad diferente, correspondiente a una sola capa de la guía de ondas.
-
En la parte posterior, encontramos el dispositivo de visualización real: un dispositivo LCOS de color secuencial de campo (FSC) OmniVision OP02222. Es probable que sea una variación personalizada de OmniVision OP02220.
-
-
-
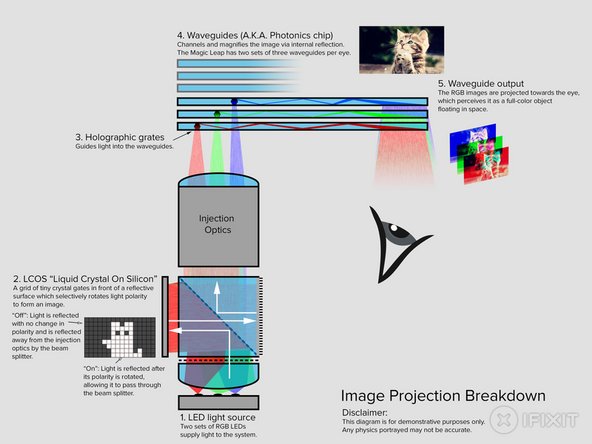
Hagamos una inmersión más profunda en el proyector y la óptica de la guía de onda.
-
Entonces, ¿qué es todo esto sobre seis capas? Hay una guía de onda separada para cada canal de color (rojo, verde y azul) en dos planos focales distintos.
-
Sin guías de onda de colores específicos, cada color se enfocaría en un punto ligeramente diferente y deformaría la imagen.
-
La "Figura 6" de la solicitud de patente Magic Leap 2016/0327789 arroja luz sobre el funcionamiento interno de la óptica.
-
Para su edificación y deleite, hemos incluido nuestro propio "diagrama tl; dr" para este sistema, completo con gatos.
The “tl;dr diagram” has the positions of the LED light source and LCOS grid swapped: Light from the LCOS will not be reflected into the waveguide. The figure from the Magic Leap patent is correct.
Well, yes and no. The position of the components shown in our diagram is correct—unlike in the patent drawing, the physical Leap One does have the light source at the back, firing forward (toward the waveguides). The LCOS grid is on the top, facing down. However, our graphic is incomplete and does not show every optical component—so if you’re trying to follow the light path through the entire system, you’re going to get tripped up and the system won’t “work.” Our graphic was originally meant to be a high-level conceptual overview and probably got too detailed for its own good. It certainly won’t satisfy any optics experts. But if you’re trying to understand the whole system, here’s a hint: there’s a mirror on the other side of the beam splitter, directly opposite the LCOS panel.
I wished there were more detailed images of complete breakdown of the projection system instead of trying explain the process. Some of us already have a good understanding of the process and have relied on IFIXIT to show us the components to verify our assumptions. With only few images we are still relying on vague block diagrams.
-
-
-
Un bloque de magnesio fundido contiene todas las ópticas y sensores, y es sorprendentemente fuerte para un HMD. Los auriculares VR que hemos desmontado utilizan todos los plásticos ligeros usados.
-
Pero el metal hace un mejor disipador de calor, y la electrónica y la iluminación IR (probablemente dispositivos VCSEL) producen calor.
-
Ese material rosado es pasta térmica para ayudar a disipar el calor del telémetro IR.
-
El metal también ofrece un lugar de montaje más rígido para mantener la óptica estable y enfocada después de su calibración rigurosa.
-
Pero la rigidez no siempre es lo mejor: algunos de estos componentes están montados con espuma adhesiva, que será más tolerante a medida que las cosas se flexionan cuando se calientan.
-
-
-
Ya no está perfectamente ubicado, también podemos quitar las tapas de los sensores para verlos más de cerca.
-
Estas matrices de sensores gemelas se asientan en cada una de las patillas, con el sensor de profundidad infrarrojo con luz estroboscópica colocado justo en el centro.
-
Una mirada más cercana al sensor de profundidad del puente de la nariz nos da el hardware de lectura de la sala en forma de:
-
Cámara de detección de infrarrojos
-
Proyector punto IR
-
-
-
Al conectar todo ese equipo sensorial a la banda para la cabeza, tenemos costosos y flexibles cables de capas que alojan:
-
Unidad de procesamiento de visión Movidius MA2450Myriad 2
-
SlimPort ANX7530 4K DisplayPort receptor
-
El puente del sensor OmniVision OV680 para procesar secuencias de imágenes simultáneas de varias cámaras (como encontramos en el teléfono Amazon Fire)
-
Altera / Intel 10M08V81G - 8000 FPGA de celda lógica, posiblemente para lógica de cola, o manejo de datos de MV parte o cámara puente
-
Redireccionador USB 3.0 bidireccional Parade Technologies 8713A
-
NXP Semiconductors TFA9891 amplificador de audio
-
Texas Instruments TPS65912 PMIC
This page is more useful to tell what’s inside the Altera/Intel 10M08V81G (the linked datasheet only lists operating conditions and specs that are of no interest to most people)
https://www.intel.com/content/www/us/en/...
Family table
The Myriad 2 is a vision processor, not a display processor. It’s going to be used here as a front-end processor for the cameras.
Fixed! Thanks for the tip. No idea how we managed to bungle that one—had a link to the right datasheet but somehow not the description. :p
“Possible camera combiner chip” is more specifically the OmniVision OV00680-B64G Sensor Bridge
Good find—thanks for sharing! We’ve updated the description.
With the way TI marks packages, “78CS9SI” is not the part number; use the second number instead. It’s tough to tell exactly from the image, but it looks like it might be “65912,” which would make it the TPS65912 power management unit chip.
Confirmed (again—2 for 2!). Thanks a ton!
-
-
-
Al arrancar uno de los dos anillos de emisor de infrarrojos, encontramos la cámara de infrarrojos de seguimiento ocular que se esconde detrás de un filtro oscuro.
-
Estas parecen ser cámaras OmniVision CameraCubeChipcon filtros dicroicos montados externamente.
-
-
-
Ahora las cosas se ponen un poco destructivas, pero vale la pena echar un vistazo a la cadena óptica.
-
Un pequeño anillo de seis LED inicia el proceso: rojo, verde y azul, dos veces para dos planos de enfoque.
-
Luego, los LED brillan en la microdisplay LCOS para generar una imagen. Está montado en la carcasa de plástico negro de al lado.
-
Desde el interior de la carcasa, una lente colimadora alinea la salida de luz bruta de los LED y se monta en un divisor de haz polarizador.
-
Los haces polarizados luego pasan a través de una serie de lentes para enfocar la imagen en las rejillas de entrada de las guías de onda.
-
Las rejillas de entrada en sí mismas parecen pequeños puntos incrustados en las seis guías de ondas (ahora ligeramente destrozadas).
-
Recogemos la unidad de "inyección" para verla más de cerca, revelando los colores asociados con cada rejilla de entrada: dos rojas, dos verdes y dos azules.
Thanks for this. It also explains the process they are using to derive the six planes, which incidentally corresponds to the six color fields the OmniVision LCOS is capable of generating at I assume 1/360th of second per field. However this does not explain how they can sustain a two complete RGB frames in 1/60th of second unless the image resolution is 1280x720 (allowing 120 fps) instead of 1920x1080 (60 fps). Unless they multiplex the six LEDs at 1/360th of second with two frames of image information. Essentially if the resolution is 1080P (unlikely) the NVIDIA TX2 is processing two (1920 x 2) x 1080 images (one for each eye) every 1/60th of second. Pretty impressive, but I think it is actually just 720P as confirmed in my Unity SDK the image is 1280 x 960.
-
-
-
Ahora que hemos tenido nuestro sabroso tratamiento óptico, es hora de dirigir nuestra atención a los cerebros de esta operación, ¡el Lightpack!
-
Es difícil pasar por alto esos conductos de ventilación prominentes. ¿Este pequeño PC de bolsillo tiene un sistema de enfriamiento activo? Pronto lo veremos.
-
Estas marcas FCC no rinden mucho, aparte de que están diseñadas por Magic Leap y ensambladas en México. Se dice que la identidad del fabricante real de hardware es un secreto bien guardado.
-
-
-
Abrir el Lightpack para abrir requiere mucho trabajo, pero el calor y la manipulación cuidadosa hacen el truco eventualmente.
-
La mayoría de los audífonos VR parecen tomar después de las PC con muchos cables, pero este es un solo cable permanente, atrapado bajo una tira de LED de estado, algunos tornillos y algo de cinta de cobre.
-
Otra pieza sólida de magnesio fundido ya no está en camino, ¡y contemplamos la placa base!
-
-
-
Ignoramos el conector modular para auriculares y el panel de botones, en favor de ese campo de silicio lleno de escudo.
-
Un fan de Cooler Master favorito de la PC agracia a esta PCB, explicando las ventilaciones que vimos anteriormente.
-
Girar los tornillos no es suficiente para liberar el disipador de calor, que está muy pegado en su lugar. Después de unos diez minutos de calentamiento y palanca, finalmente afloja su agarre conductor.
-
-
-
Unos cuantos escudos más tarde y su hora de mirar las fichas que hacen que la magia suceda:
-
2x Samsung K3RG5G50MM-FGCJ32 Gb LPDDR4 DRAM (64 Gb o 8 GB en total)
-
Murata 1KL (probablemente módulo Wi-Fi / Bluetooth)
-
Nordic Semiconductor N52832 RF SoC
-
Cargador de batería Renesas Electronics 9237HRZ buck-boost
-
Altera (propiedad de Intel) 10M08MAX 10 campo programable gate array
-
Maxim Semiconductor MAX77620M gestión de energía IC y Parade Technologies 8713A redireccionador USB 3.0 bidireccional
Yellow box is not Parade Technologies 8713A , that is WIFI AC, BT MODULE from Murrata
Thanks for pointing that out, I’d mixed up two chips. It’s correct now.
-
-
-
Y un poco más de magia en la parte posterior:
-
Toshiba THGAF4T0N8LBAIR 128 GB de memoria flash NAND universal
-
Spansion (ahora Cypress) FS128S 128 Mb quad SPI NOR memoria flash
-
Texas Instruments TPS65982Controlador de suministro de energía USB tipo C y USB
-
uPI Semiconductor uP1666Q controlador de 2 fases buck
-
Monitor de voltaje bidireccional Texas Instruments INA3221
-
-
-
A continuación, la sección del platillo se levanta, dejando la carcasa de la batería vulnerable a nuestras manos indiscretas.
-
Llegar a la batería fue tan difícil que es casi irónico encontrar lengüetas de extracción para extraer, ¡pero son mejores que nada!
-
Magic Leap incluye este sándwich de batería de doble celda con 36.77 Wh, que funciona a 3.83 V. Eso está en el mismo rango que algunas tabletas populares.
-
-
-
El Magic Leap One es claramente una pieza de hardware costosa y de ejecución corta. Cada parte de la construcción está destinada a mantener la calibración precisa durante la vida útil del dispositivo. Nuestra conjetura sería que esto fue expulsado a toda velocidad, independientemente del precio, para obtener algo en el mercado.
-
Esperemos una edición para el consumidor que mantenga el diseño atento y la dedicación a la durabilidad, al mismo tiempo que evite la falta de visión de este dispositivo.
-
Un agradecimiento especial a Karl Guttag de KGonTech, quien contribuyó con su invaluable tiempo y experiencia para ayudarnos a navegar este desmontaje.
-
El experto en VR, y nuestra némesis a veces, Palmer Luckey también contribuyó con un gran contenido, así como con acceso al hardware. Puedes leer su versión completa del Magic Leap One aquí.
-
Por último, es hora de asignar un puntaje de reparabilidad.
Palmer got fired for lying and stealing. He broke signed contracts and without community involvement or their consideration is now a mod at Reddit in violation of several moddiqette rules. He is a joke and you disgrace yourself accepting anything from him.
-
- Los altavoces son fáciles de quitar y reemplazar con un solo destornillador.
- Los sujetadores roscados son todos de la variedad estándar Torx y Phillips.
- El desmontaje es en su mayoría no destructivo, en el papel, de todos modos. Con esta cantidad de pegamento en esta cantidad de componentes frágiles, es mejor que tengas mucha paciencia y una mano firme.
- La batería solo es reemplazable si está dispuesto a retirar la placa base y pasar de puntillas por varias barreras de pegamento intenso.
- No hay una ruta de actualización para ninguna de las ópticas o el procesador, algo decepcionante en un equipo de $ 2,300.


Consideraciones Finales
Calificación de Reparabilidad


(10 es lo más fácil de reparar)
Un agradecimiento especial a estos traductores:
74%


Estos traductores nos están ayudando a reparar el mundo! ¿Quieres contribuir?
Empezar a traducir ›
15 comentarios
In Step 10, figure 2 (the figure from the patent) the ‘optional’ polarizing filter (2072) is not very optional. And you skipped it in your summary image.
It’s likely a three-wavelength, 1/4-wave retarder used to rotate linearly-polarized light to circularly-polarized light before it bounces off the LCOS. The reflected light goes through another 1/4 wave so it’s now 1/2 a wave from the input light. That is - it’s linearly polarized 90 degrees from the original light. That’s why the polarizing beam splitter cube is able to separate the input field (100% coverage) from the LCOS-reflected fields. They’re 90 deg. different polarization.
Also, that means the RGB emitters aren’t likely LED’s. They’d have to be laser diodes (or VCSEL’s) to have the narrow spectrum necessary for the 1/4 wave retarding film.
Wick, you seem to know something about this subject, but you are wrong about the Figure from the patent. The beam splitter will polarize the light but having two might work better.
In the final configuration and as diagrams by iFixit (the 3rd figure with respect to Step 10) they absolutely need a polarizer (as show) right after the LEDs or else half the light will go strait into the injection optics without modulation. This 3rd figure does leave out a quarter-wave plate and polarizing mirror on the right side of the beam splitter cube that is necessary to bounce the light back to the beam splitter so it can be directed out to the injection logic. As drawn, the light from the LCOS would go through the beam splitter and out the side of the cube.
I want to add to my prior comment that I have only seen the teardown pictures and had to mentally reconstruct what was going on from picture. I did not see the components as they were taken off. Based off the pictures, I was trying to make it work based on what I was seen from static pictures.
Something that concerns me in this design is that the LED light is shot straight at the beam splitter and if the polarization is not great with the first/LED polarizer and the beam splitter, there will be a spot of uncontrolled light (about the size of the LEDs) in the center of the image. I’m assuming they are using wire grid polarizers in both locations.
Another issue with the design is that the image has to pass through and reflect off the beam splitter (if based on what I was shown and was told is correct). Usually with a wire grid polarizer, you don’t want to pass the “image” of the LCOS through the polarizer as it will do damage to the image. The FIG 6 from the patents would be the “normal” configuration.
Ye-gods, thats a lot of impressive technology squeezed into a small package! No wonder it has taken so long to develop. I’m skeptical that it will ever be a commercially viable product. They are surely shipping significant dollars along with each developer unit. My prediction is that, at best, it will be a high-end business-use product, never a consumer product. Most probably MagicLeap will be acquired by a major before too long, and a year later the major will kill it, having found the skeletons in the closet and determined it will never be profitable — especially with consumers now embracing lower-tech, lower AR quality devices. But hey, congrats to ML for being aggressive with technology, and I wish them the best of luck. Thanks for the superb tear-down, finally revealing the long-standing mystery of ML, IFIXIT!
The device is reminiscent of a camcorder, with a lot of optics and electronics compressed into a small volume and not a lot of consideration to repairability. There’s a lot more engineering here than a VR headset and I’m impressed how far Magic Leap has iterated the design for a developer release. That said, having a non-replaceable battery would be a disaster for a consumer release IMHO. Great teardown!
Every bit of the teardown proves my thought that ML was in full “use whatever it takes to get something awesome and tangible into the light of day and hands of tech journalists”.
The idea of ML’s defining headlines being stuff that had words like “failure, $500M+, defunct, etc” was something they were going to break everything to avoid.
This iteration of the tech is a proof of concept device purely for the sake of quieting naysayers and settling the growing number of very worried investors and future buyers.
If this operates at even 75% “WOW Factor” it may earn them the time they need to finish designing their actual consumer level device. I have a feeling their mass production model will barely resemble this. The battery placement and total absense of maintenance/repair/replace indicators kinda proves that.
I am skeptical that the mass-produced model will ever be a reality, but I have a bit more hope than normal now that I've seen the Nissan GTR level of obsessive care in the build quality of this device.
Also, I didn't have enough space to write how absolutely blown away I am at the quality of this teardown. Beyond just the physical work, the extra research put into explaining it is brilliant. The confusing bits of tech are easy to understand and including the links tobsources and part data right with the test instead of just a pile of footnotes at the bottom helps let me decide just how deep down the tech rabbit hole I want to go!
I've read and loved many of these from ifixit, but you guys/girls/robots have reset the bar (again) with this one. Well done!
I agree, this is absolutely awesome work by ifixit!
Confused with one camera can magic leap track each eye independently?
One eye-tracking camera per eye, you can see the corresponding black square in the lens opposite the one we opened up!
Has iFixit torn down the Microsoft HoloLens from 3 years ago?
How does Magic Leap One compare to the HoloLens??
@johnwnguyen We have not. My understanding is HoloLens uses a waveguide display as well, albeit with a narrower field of view. Magic Leap One also has the benefit of an additional focus plane, although how much that actually contributes to the experience I couldn’t say. If you want the details, I can’t recommend Karl’s blog highly enough—he sniffed out Magic Leap’s trail early and correctly predicted that they’d use display technology more similar to HoloLens than not. (He’s a bit hard on Magic Leap at times, but IMO does a great job cutting through the hype and presenting all the known facts.) Palmer’s writeup also makes numerous comparisons to the HoloLens, summing up Magic Leap One as “slightly better than Hololens in some ways, slightly worse in others, and generally a small step past what was state of the art three years ago – this is more Hololens 1.1 than Consumer AR 1.0.” Worth a read.
I’m curious about the microphones, I’ve seen that there may be four of them. Are these in the “sensor arrays”? Where are they aimed? Are they being processed by a chip and then input into the processor, or are they all processed in realtime by the processor unit?
Comentar que ya he tenido varias Magic Leap One Creator Edition, Size 1 y Size 2, y todas al cabo de unos meses se han roto, en concreto el problema es que al abrir y cerrar la diadema para colocar en la cabeza, el pequeño conector y cable flex que conecta el sensor magnético se rompe y deja inutilizable las gafas por completo, sin el mando controlador no se pueden usar. Un fallo terrible de diseño al estilo flexgate de los macbook pro. // Comment that I have already had several Magic Leap One Creator Edition, Size 1 and Size 2, and all of them have broken after a few months, specifically the problem is that when opening and closing the headband to place it on the head, the small connector and the flex cable that connects the magnetic sensor breaks and makes the glasses completely unusable, without the controller they cannot be used. A terrible design flaw in the flexgate style of the macbook pro.
The CUDA cores are a fixed feature of the Parker SoC - not a separate semiconductor. They don’t deserve an individual bullet in this listing.
alexander.stohr - Contestar