Saltar al contenido principal

Qué necesitas

Este desmontaje no es una guía de reparación. Para reparar tu LG Versa, utiliza nuestros manuales de servicio .

  1. LG Versa Teardown, LG Versa Teardown: paso 1, imagen 1 de 1
    • Insert wisdom here.

  2. LG Versa Teardown: paso 2, imagen 1 de 3 LG Versa Teardown: paso 2, imagen 2 de 3 LG Versa Teardown: paso 2, imagen 3 de 3
    • LG Versa has a 3" touchscreen with a call, power, and clr button on the front.

    • On left side you will find the volume control buttons and camera button. Also, the charger port.

    • On the other side you will find the microSD or microSDHC slot.

  3. LG Versa Teardown: paso 3, imagen 1 de 2 LG Versa Teardown: paso 3, imagen 2 de 2
    • The LG Versa has a 2.0 megapixel camera with a LED flash on the back

  4. LG Versa Teardown: paso 4, imagen 1 de 1
    • On the right hand side of the LG Versa there is a latch to open up the back of the cell phone. Push the latch up and lift off the back of the phone exposing the battery.

  5. LG Versa Teardown: paso 5, imagen 1 de 2 LG Versa Teardown: paso 5, imagen 2 de 2
    • Simply insert your finger in between the slot and the battery and push down and up to remove the battery.

  6. LG Versa Teardown: paso 6, imagen 1 de 1
    • Six Phillips screws holding down the battery housing (Circled in the picture). Unscrew the six screws and put them aside.

  7. LG Versa Teardown: paso 7, imagen 1 de 2 LG Versa Teardown: paso 7, imagen 2 de 2
    • Insert a safe prying tool between the slot between the front screen housing and the battery housing to remove the battery housing.

  8. LG Versa Teardown: paso 8, imagen 1 de 1
    • In the bottom right corner of the logic board, disconnect the button connector with tweezers or a prying tool.

  9. LG Versa Teardown: paso 9, imagen 1 de 1
    • Use a prying tool to safely lift up the logic board from the logic board housing

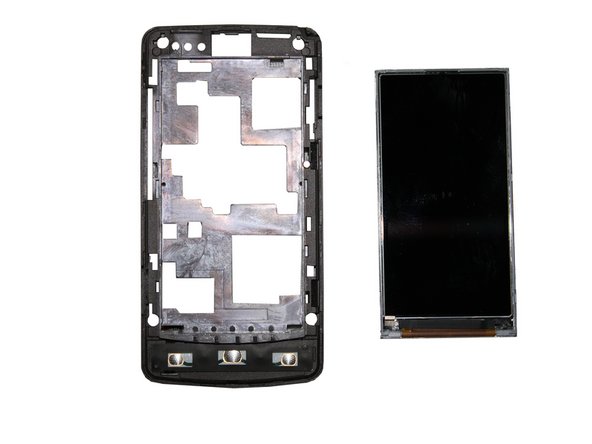
    • The logic board is connected to the speaker and the LCD screen from the back. Do not lift the logic board too high or you will have to replace the LCD screen and the speaker.

  10. LG Versa Teardown: paso 10, imagen 1 de 2 LG Versa Teardown: paso 10, imagen 2 de 2
    • The LCD screen is connected to the bottom of the logic board. Once you lift the logic board use tweezers or a safe prying tool to disconnect the ribbon wire from the LCD screen to the logic board.

  11. LG Versa Teardown: paso 11, imagen 1 de 2 LG Versa Teardown: paso 11, imagen 2 de 2
    • Lift the logic board carefully and use a safe prying tool and tweezers to remove the speaker.

    • The speaker is attached to the housing with a rubber adhesive be careful not to rip the wire from the logic board and the speak apart

  12. LG Versa Teardown: paso 12, imagen 1 de 1
    • In the top right corner of the housing use a pry tool to disconnect the touch screen digitizer connector from the housing.

  13. LG Versa Teardown: paso 13, imagen 1 de 2 LG Versa Teardown: paso 13, imagen 2 de 2
    • Removing the logic board housing from the front housing is the most difficult part of the tear down.

    • Start on the side with the volume control buttons and use a safe pry tool to separate both housings.

  14. LG Versa Teardown: paso 14, imagen 1 de 2 LG Versa Teardown: paso 14, imagen 2 de 2
    • Use the safe pry tool around the perimeter of the phone until you are able to separate both housing apart.

    • Remove the Lock, Volume, and Front buttons from the housing.

  15. LG Versa Teardown: paso 15, imagen 1 de 2 LG Versa Teardown: paso 15, imagen 2 de 2
    • Simply lift the LCD screen from the logic board housing to remove the LCD screen.

  16. LG Versa Teardown: paso 16, imagen 1 de 1
    • Congratulations you have fully torn down the LG Versa.

0 comentarios

Agregar Comentario

Ver Estadísticas:

Ultimas 24 horas: 0

Ultimos 7 días: 2

Ultimos 30 días: 2

Todo El Tiempo: 6,129