Introducción
Right in the middle of the grand finale of this year’s flagship smartphone season, Huawei throws their last big fighter into the ring: the Mate 20 Pro! On paper, it looks more powerful than ever—but only a teardown will tell if it’s a true champion or just a poser.
You can link up with us on Facebook, Instagram, and Twitter. We've got a newsletter too, if you're more into emails.
Qué necesitas
-
-
Here's what the Mate 20 Pro brings to the ring:
-
6.39" AMOLED display with a resolution of 3120 × 1440 (~538 ppi)
-
Huawei Kirin 980 chipset: Mali-G76 MP10 GPU and an octa-core CPU (2x 2.6 GHz Cortex-A76 cores, 2x 1.92 GHz Cortex-A76 cores, and 4x 1.8 GHz Cortex-A55 cores)
-
Triple rear cameras: 40 MP ƒ/1.8, 20 MP ƒ/2.2, and 8 MP ƒ/2.4 lens with 5x optical zoom
-
24 MP ƒ/2.0 selfie cam
-
IP68 dust/water ingress rating
-
Android 9.0 (PIE)
-
Facial recognition hardware, and an under-display fingerprint sensor
-
-
-
Face to face with Huawei's champion from last season, the Mate 20 Pro sports a newly notched, curved display.
-
The Mate 20 Pro swaps out the rear fingerprint sensor for a third camera. But is three enough to keep up with the competition?
-
Our Mate 20 Pro is dressed up in the industry-standard glass sandwich, but the rear glass isn't quite as standard as it looks. Huawei applied a non-slip, fingerprint-resistant coating to help prevent slippery accidents.
-
The Mate 10 Pro's loudspeaker holes give way to the the SIM and NM card tray in the Mate 20 Pro.
-
-
-
Undaunted by a fragile rear glass panel thanks to recent teardowns of glue-filled competitors, we grab our heat gun and get to work.
-
Some heat helps the Mate 20 Pro to relax before our standard tools finish the job!
-
Thanks to the relocated fingerprint reader, there's no danger of tearing delicate flex cables while removing the rear cover.
-
-
-
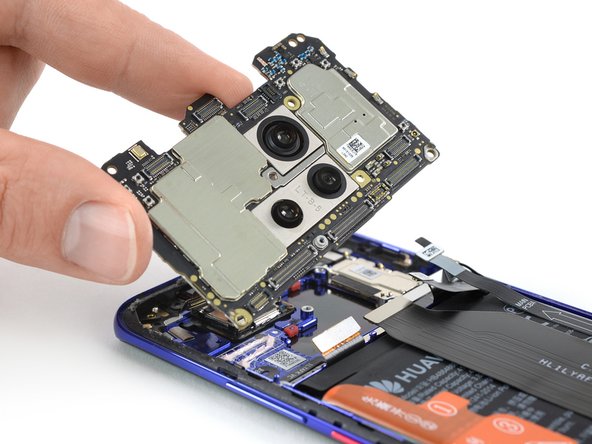
At first glance, the motherboard looks free to jump right out, but a closer look reveals nine flex cables holding it in place, plus an antenna cable.
-
Like the P20 Pro, the Mate 20 Pro sticks to a relatively small motherboard, leaving room for a wider battery.
-
With the 3D face unlock hardware and the triple rear camera taking up more motherboard space than usual, Huawei had to cut some camera holes and change the layout a bit.
-
After prying away some
loving armsflex cables, we manage to remove the motherboard along with the rear cameras.
-
-
-
...which are easily removed after disconnecting two additional flex cables. Praise our good old friend the spudger!
-
The Mate 20 Pro has three rear cameras:
-
Top right: 40 MP, ƒ/1.8, 27 mm-equivalent wide angle lens
-
Bottom right: 20 MP, ƒ/2.2, 16 mm-equivalent ultra wide angle lens
-
Bottom left: 8 MP, ƒ/2.4, 80 mm-equivalent telephoto lens with 5x optical zoom
-
The P20 Pro's monochromatic camera is ditched for an ultra wide angle lens, ideal for landscape and macro shots (at a minimum focal distance of 2.5 cm).
-
-
-
-
With the cameras out of the way, the motherboard takes center stage. Here's what it has to offer:
-
Toshiba THGAF8T0T43BAIR 128 GB Universal Flash Storage
-
HiSilicon Hi6421 power management IC
-
Skyworks 78130-21 front-end module for WCDMA/LTE bands 8/12/13/20/26/27
-
Skyworks 78132-52 front-end module for WCDMA/LTE bands 7/30/40/41
-
Skyworks 78131-21 front-end module for WCDMA/LTE bands 1/2/3/4/25/34/39
-
Skyworks 7360-2A 04115.1 1821 MX RF module
-
HiSilicon Hi6422 envelope tracker
-
-
-
We snoop around the notch area and pull out the familiar-looking front camera / 3D face unlock assembly. It doesn't seem to completely mate up with what Huawei showed during their launch event, but our best guesses include:
-
Dot projector
-
24 MP, ƒ/2.0, 26 mm-equivalent lens, borrowed from the P20 series
-
Rangefinder / proximity sensor
-
Flood illuminator
-
Ambient light sensor
-
IR camera
-
Rectangle of mystery
-
-
-
We use a pair of tweezers to dig out the last bits behind the motherboard.
-
The missing piece: a small interconnect board for the power and volume buttons. We find the following chips:
-
IDT P9221 1827SC SL-15 IDT wireless power receiver
-
LMIK36 B8283V26 PHIL
-
35L35A B1AG1527 SG
-
871 3644TI C37H
-
With the Mate's brains dissected, it's time to head towards the other end of the phone and check out its fancy footwork.
-
-
-
SIM trays aren't ordinarily exciting, but this tray happens to support a new memory card format called nano memory (NM).
-
The new NM cards are nano-SIM sized expandable memory (45% smaller than a normal SD card) and can offer a maximum read speed of 95 MB/s.
-
The smaller format also allows this SIM/NM tray to be smaller than a traditional dual-card tray.
-
-
-
Just like in the P20 Pro, the USB-C charging port is mounted to a large flex cable. This means if the charging port fails, you'll only have to replace the main cable—instead of a more expensive daughterboard, as in the Google Pixel 3 XL.
-
Another similarity to the P-Series: no 3.5 mm headphone jack. USB-C headphones are included along with a 3.5 mm adapter.
-
The other port, a SIM reader, is mounted to a small board, and planted near the coin-style vibration motor.
-
-
-
Moving swiftly along, we take a closer look at the Mate's power plant.
-
To our surprise, we find some orange pull tabs on the left side of the battery, containing a short guide how to remove it—we love guides!
-
We're happy whenever we can extract a battery without having to break out our iFixit Adhesive Remover—in this case, we just needed a little help from an iOpener to unseat it.
-
The battery weighs in at an unprecedented 16.04 Wh (4,200 mAh at 3.82 V).
-
-
-
We unleash a multi-headed heat-gun serpent—we named it Pat—which blasts through the curved display's IP68-rated adhesive.
-
There is one last big secret we need to explore to give Huawei's newest fighter a ranking—the 3120 x 1440 pixel, 19.5:9 ratio (~538 ppi density) display!
-
An opening pick or eleven dramatically improves this smartphone's aerodynamics, and helps us pry up the display.
-
-
-
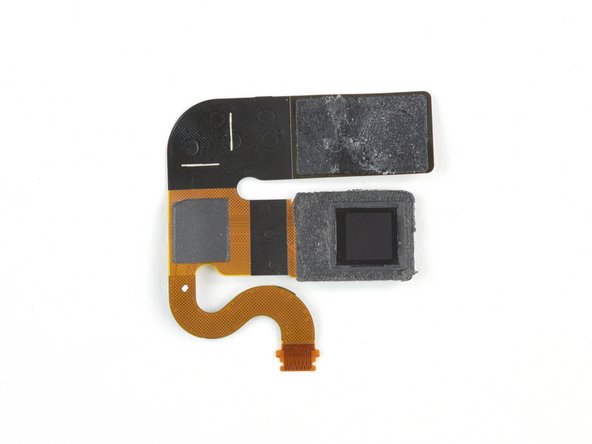
Thought we were done already? Not yet! Last, but certainly not least, let's take a closer look at Huawei's new finger-reading tech.
-
The fingerprint sensor is made by Goodix and sits under the AMOLED panel, though Goodix markets the tech as an "in-display fingerprint sensor™".
-
The sensor isn't capacitive (like most familiar sensors such as Touch ID), but optical. This is reportedly similar to the sensor found in the new OnePlus 6T.
-
-
-
That's it! The fight is finished, and we retreat to our corner. There will always be new challengers in the smartphone market, but this round is now at an end.
-
If you would like a nifty wallpaper as a souvenir, you can find one here!
-
- Many components are modular and can be replaced independently.
- Battery replacement requires removing only the back panel and midframe.
- Only standard Phillips screws are used along with an average amount of adhesive.
- Because of the sandwich build around the motherboard, there are more flex connectors than average and repairs will consume more time.
- Glued-down front and back glass means greater risk of breakage while making repairs difficult to start.
- Screen repairs require a lot of disassembly while battling tough adhesive.
- A broken screen probably means you need to replace the fingerprint reader as well, or vice versa.


Consideraciones Finales
Calificación de Reparabilidad


(10 es lo más fácil de reparar)

Equipo

36 comentarios
Hi. May I know if there are any waterproofing seals or gaskets around the power /volume buttons? Something similar to the note 7?
It isn’t possible to see if there’s an extra plate with gaskets like in the Note 7 or the P20 Pro because of the mid frame plastic, that covers the volume and power buttons. We assume that the pins of the buttons run through a tight fit hole in the frame and there’s possibly a small rubber ring or gasket to guarantee the IP68 rating.
The loudspeaker sits on top of the USB-C charging port and the SIM/NM card try. You can see it in the last picture bottom left.