Introducción
My old Canon PowerShot S500 digital camera stopped working suddenly one day.
The camera would beep loudly and display an "E18" error code on the LCD when you tried to power it on. This code means the lens is stuck and won't extend/retract - this is a common problem with many Canon PowerShot cameras. I assumed some dirt or grit got inside and jammed up the lens.
Attempts to unjam the lens via external methods failed, so with nothing to lose I decided to take the camera apart and attempt to fix it.
The following photos show how to dismantle the S500.
(FYI the PowerShot S500 is a 5 megapixel camera introduced in Feb 2004)
Qué necesitas
-
-
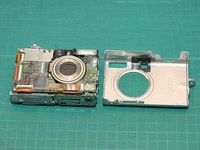
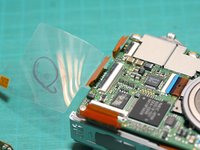
Here are all the components of my disassembled Canon PowerShot S500, excluding the battery and screws.
-
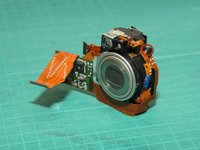
The second photo show what the camera looks like before (and hopefully again after!) repair. (yes, I was able to put it all back together again!)
-
Follow along to see how to take apart and repair this camera, and to see what's inside...
-
-
-
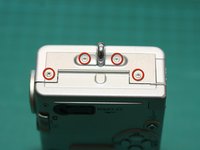
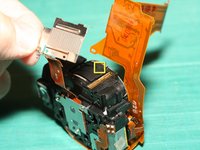
... gently flip up the black catch at the edge of the ribbon cable connector. You can now pull the ribbbon cable out of the connector.
-
In the 2nd photo, you can see the bottom plate, along with rear button switches, and battery door microswitch.
-
Note: there is still a clear plastic insulating sheet attached between this assembly and the camera. It will be detached at a later step.
-
-
-
-
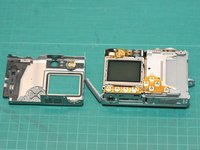
With the main logic board swung aside, the target of our repair is nearly visible! - the lens module...
-
The 2nd photo shows another view with the logic board out of the way. The clear plastic insulating sheet holding the lower metal plate is fastened under here and can now be removed
-
-
-
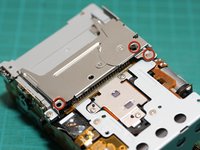
Remove the 3 screws holding the CF card slot.
-
Lift up the CF card slot - in the 2nd photo you'll see a ribbon cable going through the slot to the front of the camera. We earlier disconnected this ribbon cable from its socket on the front of the main PCB.
-
Simply pull the ribbon cable out, but be sure to note the slot it goes through for later reassembly.
-
The 3rd photo shows the rear of the camera with the CF card slot removed.
-
-
-
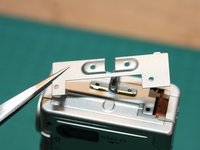
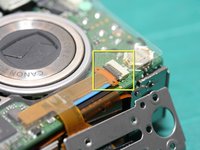
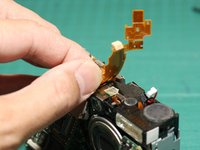
Back on the top of the camera, gently pull the white connector with red/black wires out of the socket.
-
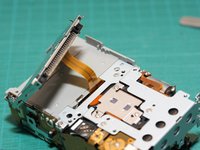
Now gently pull up the flex circuit and the socket away from the camera top
-
The 2nd photo shows the flex circuit and socket from the last step lifted away from the camera. This will now allow us to separate the plastic chassis of the camera from the lens module assembly in following steps...
-
-
-
Remove the first of three screws fastening the optical viewfinder to the rest of the lens module...
-
... then remove the second screw (2nd photo).
-
The optical viewfinder can be separated from the lens module - however it's still joined by a flat flex ciruit - be careful not to damage this flex circuit; just leave the viewfinder dangling to the side.
-
-
-
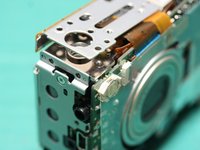
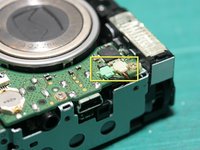
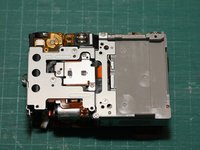
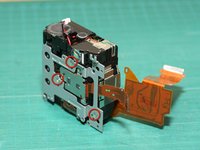
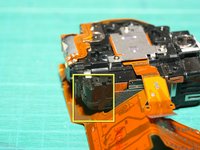
The geartrain for the lens retraction motor is inside this corner of the lens module.
-
(Note in this photo, the optical viewfinder is still attached to the right)
-
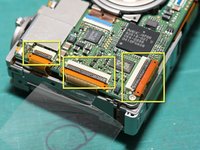
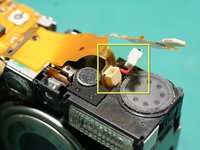
In the 2nd photo, viewed from another angle there's a hint of the lens retraction geartrain - the small white gear visible through a hole in the back. The lens retraction motor is highlighted with the yellow rectangle in the 2nd photo.
-
-
-
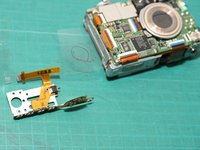
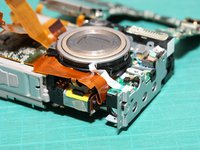
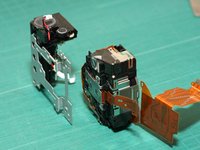
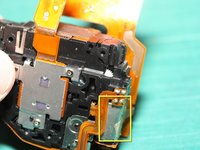
Removing this small screw circled in red will free the small metal plate on this side of the lens module assembly.
-
In the 2nd photo the small plate is being removed.
-
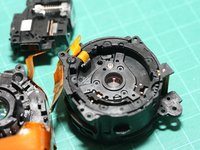
You can now see the main large brass gear which drives the lens unit in and out, and also a slider/cam that zooms the optical viewfinder (yellow square)
-
-
Herramienta utilizada en este paso:Tweezers$4.99
-
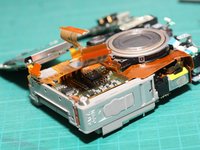
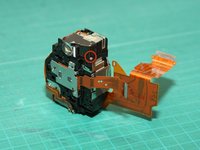
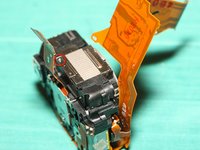
By gently pulling apart the front and back halves of the lens module assembly, we expose a black gear and white gear connecting the larger brass gear to the motor
-
Using tweezers it's possible to remove the black gear without fully opening the lens module halves - just open wide enough like shown here to gain access.
-
-
-
Success!! by removing the small black gear in the previous photos, I was able to manually spin the big brass gear to extend & retract the lens.
-
Upon closer inspection I found some sand or grit in the black gear - it must have been jamming the geartrain, causing the E18 error.
-
With the gears cleaned, I could reassemble and test the camera. No more E18 error - the lens extended and retracted again normally.
-
-
-
Wait!... not so fast. After reassembling the camera, I found a huge piece of dust on the sensor in all the new images I took. Dust must have entered the lens module during disassembly. I had to take the camera apart completely again! This time, to open up and clean the lens module. :-(
-
So here is the lens module again, with the 2 halves pulled slightly apart to clean the sensor and/or inner lens elements. It was easier to disassemble the camera the 2nd time :-)
-
-
-
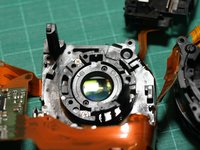
In the rear half of the lens module, you can see some of the dust on the other side of the rear lens element in this photo. The sensor itself was clean.
-
This rear element is spring mounted and can be driven forward/back for focus by a second smaller motor.
-
The 2nd photo shows another view of the front half of the lens module.
-
-
-
Three screws (red circles, shown here already removed) hold the ring surrounding the rear lens element.
-
With the ring removed, you can gently lift up the spring mounted rear element (yellow circle) with tweezers. I was then able to clean out the offending dust on the back of the element.
-
Time to reassemble everything (again!) - this time, everything worked fine AND no more dust spots in the images. Success!
-


5 comentarios
This is fantastic! Very detailed. I'm sure it will be quite helpful to people.
Now I just got to figure out how to remove the battery door from my SX130is, I've got the replacement door and hopefully this guide will help me figure out which screws to undo to remove it....
This is, by far, the epitome of tutorials! Your images...perfect! Spelling...perfect! Content...perfect! I do a lot of writing and reading online and your work here is one of the best! Like you, I had nothing to lose tearing apart my Canon since it wouldn't open. I wanted something, anything, to guide me. I found your tutorial and wow! I followed your steps and it worked out. I'm going out now to take pictures with my Canon! Thank You!!