Introducción
Sin información previa a seguir, no pude desmontar este auricular sin causar un daño irreparable a mi par personal.
No obstante, este es un excelente punto de partida para comenzar una reparación sin daños.
De nada.
Qué necesitas
-
-
Si bien parece haber una variedad de problemas técnicos con la electrónica de los auriculares Beats Studio 2.0 (tanto con cable como inalámbricos), el mío tenía un problema muy específico:
-
Apareciendo completamente cargados, sonarían (a cualquier volumen dado) por un período de no más de 1 minuto antes de apagarse, el efecto dura aproximadamente 1/4 de segundo. Tendrían que reiniciarse por completo y volver a encenderse antes de que funcionen
-
Mi hipótesis inicial: la batería no se estaba cargando correctamente, el problema del circuito interno ("desvanecimiento" puede deberse a un fallo del condensador) o algún otro componente defectuoso.
-
-
-
Tenía la esperanza de que el problema fuera una batería defectuosa (ya que son relativamente fáciles de resolver), así que decidí comenzar con el auricular del lado del cargador.
-
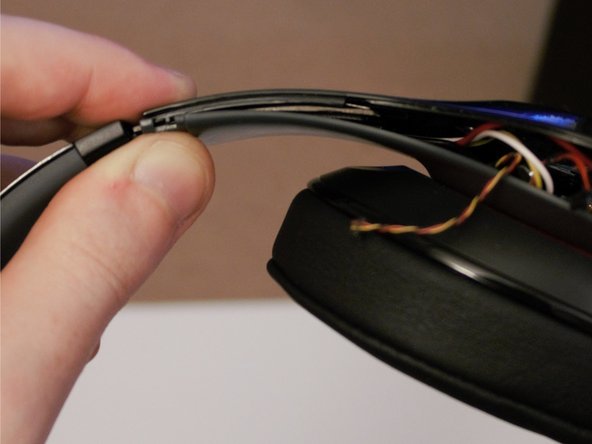
Hay agujeros sutiles en los anillos exteriores de cualquiera de los auriculares, lo que sugiere que es posible hacer palanca. El plástico que lo rodea es muy frágil, por lo que si estás tratando de salvarlo, es posible que desees aplicar calor ya que hay un adhesivo fuerte que mantiene el anillo en su lugar.
-
Después de quitar el anillo de plástico, quedaron expuestos los tornillos que sujetaban juntas las dos mitades del conjunto del auricular externo. ¡Excelente!
-
Aunque los tornillos brindaron soporte, las dos mitades no se desmoronaron simplemente: un clip de plástico circundante mantiene las dos piezas juntas. Es hora de agarrar el spudger...
-
-
-
Al colocar un spudger delgado entre las dos mitades del recipiente de plástico, es bastante fácil separar las dos mitades. Pero es probable que la parte superior no se desmonte sin luchar. Hay dos piezas principales a tener en cuenta:
-
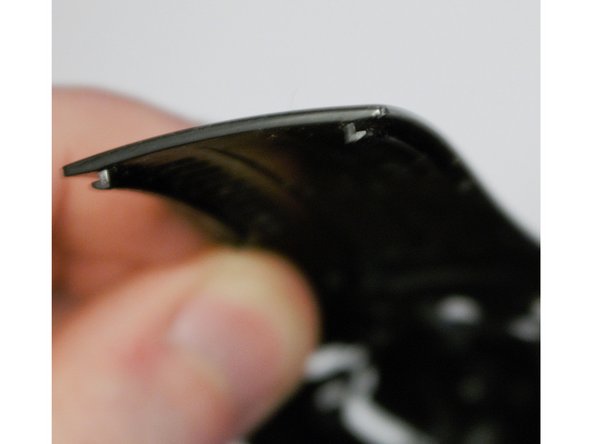
Los pequeños clips que muestran "L y "R" deberían quitarse antes de separar las dos piezas. Se enganchan en la carcasa exterior y se adhieren con un adhesivo similar a los anillos exteriores que se quitaron previamente. El truco: separa un lado hacia afuera a medida que haces palanca para separar la sección ancha del resto del caparazón.
-
Hay "pistas" profundas que unen las dos mitades. No he podido usar una técnica para hacer esto más fácil, ya que no puedes "deslizar" las dos mitades para separarlas. Al igual que con los clips L/R, concéntrate en estirar la parte interior (gris) tanto como sea posible. La fuerza será necesaria; deja un comentario si encuentras una mejor manera.
-
-
-
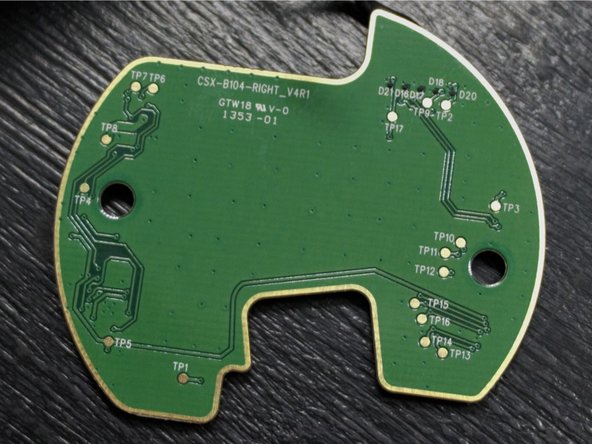
Lamentablemente, el contenido del auricular no era tan abundante como esperaba. En el interior se encuentran la batería de litio, el micrófono con cancelación de ruido, el circuito de control LED y el circuito de alimentación/carga.
-
Después de completar una inspección visual de la placa de circuito en busca de signos de fallas en los componentes (decoloración, marcas de quemaduras, exteriores derretidos, etc.), era hora de buscar respuestas en el otro auricular.
I'm having the issue that my earphones doesn't charge anymore. There if i plug it in the led blinks once and shuts oft again. I followed your instructions so far and found some "white stuff" near the black cable which is soldered to the PCB there... Any guess?
Hi Rico, I don't have the headphones anymore so I can only provide speculation. Long story short - it likely isn't the source of a problem, or a solution to your charging problem.
In one of the pictures here you can see some industrial "glue gun" glue (same idea anyways), that is used to isolate the wires in case one comes loose (so they don't short each other out), and also to provide stress relief - any tugging on that wire will be distributed more evenly than if it wasn't there.
If the substance you're talking about is actually white, it's usually one of 3 things - first, could be corrosion of some sort. Check if the substance feels powdery/chalky - if so, this could actually be a problem area. I have my doubts that it would form by the wires though... but thought I'd throw it in anyways. Second option - if it's more of a "paste" (still somewhat fluid), it might be thermal paste, used to transfer heat to another component.
Thermal paste doesn't really have a place around wires, but it's messy and could have just been spread around at the factory by accident. This shouldn't make or break anything for you.
The third option would seem kind of flexible/rubbery, this I believe is essentially a silicone compound not too different than what you use around a bathtub. It's used in the same sort of ways hot glue is, but has a very useful property - silicone doesn't melt under high heat. So you can isolate connectors, provide strength etc., and not have to worry about hot components reflowing your adhesive.
If I were you, I'd try measuring your battery's voltage with a multimeter. You can use sewing needles to get inside the contacts for the battery, and touch the sewing needles to the multimeter leads.
If the voltage is extremely low, the battery charging circuit might think there's a malfunction and just "refuse to try". Without fancy equipment, I'd recommend buying a new battery (see the model # and ebay for some hints).
If the battery is around 2.8-3v, the battery is dead, but "reasonably dead", and it likely means your headphones have a faulty charging circuit. You can try inspecting the components on the board shown here and see if any look "burned", smell weird etc., but if nothing looks suspect I'd just try to buy that circuit board again if you can find one (ebay is probably your only good source here... or someone else who's visiting that has a faulty set).
If the battery has a high voltage (like around 3.5v+)... well, you're in the same boat as I was, and it's not a battery or charging issue -_-
-
-
-
-
Basado en el lado anterior, supuse que el desmontaje del lado del conector(jack) de 3,5 mm (que se denominará "lado del conector" a partir de este punto) sería similar. Empecé quitando el anillo circundante, solo para descubrir que no había tornillos escondidos debajo.
-
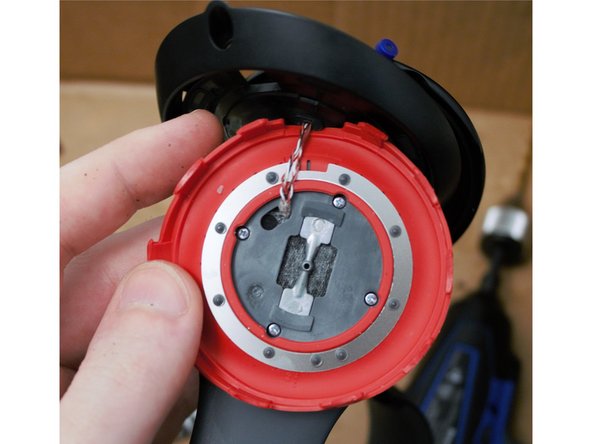
Después de hacer palanca por un tiempo, comencé a preguntarme si algún tipo de clips de plástico mantenían los dos lados juntos. Sabiendo que los dos lados ya estaban unidos con fuertes "rieles", decidí perforar las áreas donde se creía que estaban ubicados estos clips.
-
-
-
Después de realizar la perforación, noté que los auriculares ya no se encendían. Tras una inspección más detallada, uno de los agujeros perforados había penetrado en los cables de la placa de circuito.
-
Debido a su daño físico, no pude realizar un buen diagnóstico sobre la causa del problema. Mis mejores conjeturas son un chip de procesamiento o un mal funcionamiento del condensador (debido a que inicialmente funcionaron pero se desvanecieron y funcionaron durante períodos más largos si no se han reiniciado recientemente)
-
El daño físico me impidió estar más motivado para buscar signos de fallo en los componentes, especialmente sabiendo que este par de auriculares probablemente era irreparable en este punto.
-
-
-
Los agujeros que se taladraron revelaron que los tornillos estaban unidos desde el lado interior del auricular.
-
Hay algunas costuras para elegir, pero la que yo elegí (que también es la correcta) para comenzar a desmontar más se encuentra entre la almohadilla de espuma y la pequeña primera capa de plástico.
-
No hay magia que pueda ayudar mucho en este paso, ya que el calor alrededor del cojín puede deformar o derretir fácilmente el plástico, y el calor de la parte posterior no puede penetrar el plástico aislante y el aire del otro lado.
-
Inserte un spudger de metal o plástico aproximadamente media pulgada entre ellos y gire lentamente para separar. Debes escuchar cómo se libera lentamente el fuerte adhesivo.
-
-
-
Hay 5 tornillos que sujetan la fina capa de plástico (que asegura el altavoz) al otro lado de la carcasa.
-
Ubicado en el interior, puedes encontrar el conector de los auriculares, los cables para conectar al altavoz y el micrófono con cancelación de ruido.
-
Pequeños trozos de cinta evitan que los cables se muevan dentro de la caja, lo que probablemente tendrá que quitarse (ya sea para volver a adherirlos más tarde o para reemplazarlos con pegamento caliente)
-
En el medio hay una pegatina negra que oculta un único tornillo que hace una conexión estructural con el marco de los auriculares a través de la "cámara de comodidad/réfulex acústico" (es rojo en este modelo; no estoy del todo seguro de cuál es su propósito principal)
-
-
-
Después de quitar el tornillo del medio, ahora no sabía qué dirección tomar a continuación. El auricular todavía estaba firmemente conectado a la misteriosa cámara roja, y no vi un siguiente paso lógico excepto simplemente separar las dos secciones.
-
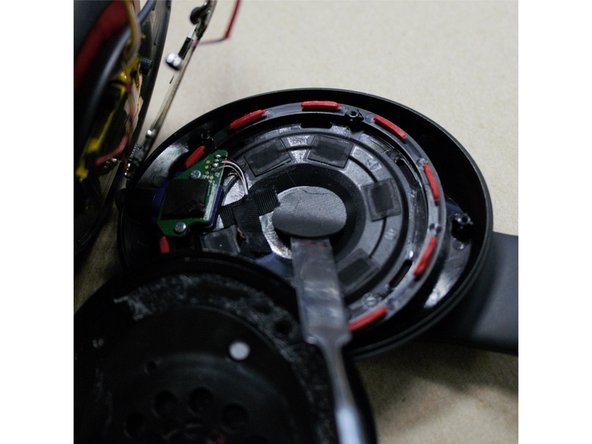
Las ranuras en la carcasa del altavoz permitieron que la goma se sujetara a ella. Empecé a obligarlos a salir de su lugar para permitir el acceso al otro lado.
-
Con todas las protuberancias de goma quitadas, finalmente pude ver el interior del área de goma. ¡Por fin! ¡Los 4 tornillos que sujetan las piezas del marco podrán quitarse!
I’m pretty sure that each of the rubber tabs had a long extension attached at the factory, which allowed them to be threaded into the slots and locked. These tabs were then cut off.
However, I was able to reassemble this after taking mine apart to glue up a broken part. Use a small but blunt flat screwdriver to “stuff” them into place. It takes a bit of pressure but with about two minutes of prodding, I was able to seat all of the tabs back into position.
I’ve pushed the rubber tabs out of the holes using a micro tweezer. I’m planning to pull them back by attaching long thin strips of tape to each tab (with the tape doubled back on itself and sticking to both sides of the tabs). I can then thread the tape strips through the holes while there is room to work, then pull them all closer and through the holes once the halves are together.
-
-
-
En lugar de separar las dos piezas, parece más conveniente perforar pequeños agujeros a través de la capa de plástico negro, lo que te permite quitar los 4 tornillos sin separación.
-
Acústicamente, esto es buena idea. Después, querrás sacudir la mayor cantidad posible de virutas de plástico y tapar los orificios lo más al ras posible con pegamento caliente: empuja una gota de pegamento caliente en el área con un dedo o una herramienta que se ha mojado con lavavajillas y agua. Evitarás que el pegamento se pegue al soltarlo.
-
En la imagen, hice lo mejor que pude para marcar las ubicaciones aproximadas para perforar. Si está desconectado, puedes hacer agujeros más grandes o un agujero separado, según tus preferencias. ¡Ten mucho cuidado, tómate su tiempo y taladra con electricidad y no a presión!
-
-
-
A cualquiera que intente reparar el circuito defectuoso dentro de sus auriculares, le deseo lo mejor y me interesaría ver los resultados.
-
Si se hace alguna guía que hace referencia a las técnicas que se muestran aquí, se agradecería que se incluya un enlace a este tutorial. En cierta forma, me ayuda a sentirme mejor al destruir mi propio set.
-
Se solicita que las imágenes utilizadas en cualquier otro lugar se vinculen a esta guía
I believe your first point is incorrect in most (if not all) situations - a battery can usually provide far more amperage than the device that it powers. As it dies, it is unable to produce the required amperage at the specified voltage - and by some physics principle that I am not well enough informed on, it is able to meet the amperage by decreasing the voltage. The voltage continues to decrease until it is no longer sufficient to power the components in the device. In essence, the mAh rating would drop, but only because this is still a fancy way of measuring wattage over time (with a cutoff for when voltage is no longer acceptable).
I have contacted the company for any possible reset instructions, none of which worked. I even tried many of the "home therapy" techniques listed here and elsewhere, to no avail. The device did reset, but constantly needed more resets, as expressed in the guide.
The charger assembly was in working condition, and the device signified that it had external power plugged in. I did not check if there was current going through the charging circuit, because the battery was already above nominal voltage and therefore fully charged (as a battery charger would read it).
I'm not sure what you mean by user-friendly... the headphones were well taken care of until the very end of the disassembly, if you are referring to product care. If you mean that the guide is not user-friendly, please make your own concentrating on the parts that you feel were missed. It doesn't sound like you are qualified to be editing this one.
To anyone who reads this looking for more information on diagnosis, I would begin looking at the surface-mount capacitors if you suffer from the same issue as I did. They are a weak point in many electronics, and do not fail immediately (potentially causing the slow shutdown). Unfortunately at the time of writing, no such resource exists for capacitor values.
Cheers this was helpful!! Is there anyway that I can buy a new shell so if I do undertake this task I can put it all back together nicely?
-


Un agradecimiento especial a estos traductores:
100%

¡ Francisco Javier Saiz Esteban nos está ayudando a reparar el mundo! ¿Quieres contribuir?
Empezar a traducir ›
23 comentarios
Hello from Russia! Faced with the problem of defective wires on the left side, before it successfully dismantling the right.
There appears to be removal of the left cover (where the key) that you drilled.
Above and below there are easily detachable clip, but left and right can not understand that. But holding so that the plastic can be broken off along the radius of the part.
Who can help?
Hi there, are you using a translator? I am having trouble understanding what you are trying to say. If you would like to upload an image that may help
Mark -
These headphones are a real headache.I really believe they are throw a ways.The screws in the tutorial were not in the exact place as shown[no fault to the tech].I have been ripping my hair out trying to repair for a young man and wish i never started.It is easier to repair a computer or LCD TV.Just found out the cost of manufacturing and shipping was shown to be around 17 dollars.Tape and glue to me is not professional.I truly appreciate this guide and without it i would have said to him, throw the away or sell online.
Hello ! I disassembled mine today for curiosity, and found out that what you did at step 3 is not the best idea, it could very easily break the plastic. They are meant to be disassembled in the following order: unscrew the 4 screws, lift the round part just enough to remove the 2 connectors (battery and speaker) and then the plastic cover slides back with no effort whatsoever. Also, when putting it back together you must do the same, slide the cover, and then by gently keeping the round portion up, put the 2 connector back. It became clear to me that this is how they assemble them at the factory, because it doesn't click back into place, even when pressed hard, instead the plastic slide starts to crack.
If you ended up taking pictures or a video of the process, I can definitely add this to the guide.
Mark -
Please Please in that new video or tutorial please show step by tutorial on a left inner hinge!
maksimillian911 - just now
I am looking for instruction for replacing hinge pins on a Solo 2 Wired.
Please Please in that new video or tutorial please show step by tutorial on a left inner hinge!
Where can the main circuit board be purchased?I cannot find anywhere online.Can anyone help?
You can find the boards on AliExpress
my Beats Studio 2 has a problem that it will lose its full charge within one day even though it's turned off. I have already replaced its battery, but the problem remains. Does anybody know that the cause is?
Not as hard as this guy made it seem? But I am a electrical engineer and Technician. But I hit the I fixit bc I was replacing the power board, after my best guess and ordered the part to be right!!, And lost track of the stupid wire layout to solder back on as my scope is really awkward to fit items under
Feel free to recommend changes where you found a better technique.
But keep in mind, everyone starts from a different position. I personally take the approach to overestimate work rather than underestimate, I've also rarely found that belittling people or their progress is helpful in the end. I'm not claiming to be one, but the sign of a true master is the ability to appear humble and let their work speak for itself.
Mark -
Hey Mark!
Can u help me with my studio beats 2.0?
If u read this, please respond me on my mail: mrzspb@gmail.com (i wanna attach some photos)
Thanks.
Thanks, this was super helpful! I had been considering attempting to fix my headphones but was afraid to damage them. Seeing the details of how it goes together beforehand helped a lot and I was able to fix my headphones with the "dead battery that doesn't charge" issue in just a few minutes, all without causing any visual damage! I may write up a guide on how to do the fix soon!
Glad to hear! And considering how many views this manual continues to get, I'd say a lot of people would find it a helpful guide.
Mark -
The Inside panel that says R is cracked from the middle, how would I replace it with a new panel and where can I find a new panel?
is it possible to add wireless module to the 500 version of beats studio? they look the same outside, just not wireless, so bought one without bluetooth (used, but in mint condition). cause my 501 version wirelesss is broken (interal wires and all that still works, just the housing of my 501 is broken)and just plain used up.
Yes, with a few adaptations. I just merged my beats studio that had a broken headband into a now wireless head band that i used for recording. Now it is wireless and corded all in one. I also placed all the buttons on one side on a line. Just basic wiring
My general idea toward you using drills is that the process is destructive. I am glad you added it.
The general idea toward these teardown is to try to be as rational as possible — look around, inside outside, and try to find releasable fasteners such as screws or clips then proceed.
That single screw in the middle of the speaker housing is surprising. I bet you’d have some more experience if you do end up having another broken pair of beats.
Second thought, corruption of software is least likely to be hardware’s fault, especially when solid state storage is so widespread — you can’t physically repair a memory chip, after all.
Wish you the lucks.
The problem with mine was obvious when I removed the screws to reveal a pinched/broken wire. The thin, and I mean VERY thin hair-like blue wire was broken. I have worked on circuit boards before and have done plenty of rewiring, however I have never worked with wires this fragile. While attempting to remove some insulation to reconnect the broken ends, I broke off more of the thin wire. Now, the two remaining ends will barely reach each other and I am stuck with having to now completely disassemble the earpiece, de-solder the wire, and replace with another. What a royal pain in the ass. Can’t find anyone locally to do this and I refuse to “mail it to a repair shop so they can “assess the problem” and charge some huge fee for nothing more than a broken wire!
Hello guys. Thanks for all the contributions and to the author for such handy way of handling the left side that was beginning to annoy me. Furtunately I don’t take risks.
I have serious issue here. Mine keeps blinking red 3 times every time I try to turn it on but i never turns on. It is fully charged with a 4V reading. It also indicates that it resets well but immediately blinks those 3 red annoying signals and stays off. Any ideas what that means? So far I have done every possible basic troubleshooting but nothing works.
I have disconnected all sources of power for 24 hours before powering on, tried resetting with/without charger or/and jack but nothing works.